
Introduction :
Learning How to Install WordPress Step by Step is the first step toward building your own website. Creating a website has never been easier, and WordPress is one of the most popular platforms for both beginners and professionals. Whether you want to start a personal blog, a business website, an online portfolio, or an e-commerce store, installing WordPress is the first and most crucial step.
If you are wondering how to install WordPress step-by-step, you have come to the right place. The best part is that you don’t need any coding knowledge or technical experience to get started. With the right hosting provider and a few simple steps, you can install WordPress in just a few minutes.
In this comprehensive WordPress guide, I will walk you through the step-by-step installation process. I will show you how to easily install WordPress with a single click using affordable and reliable hosting plans. I will also cover essential post-installation settings, common mistakes to avoid, and practical tips to make your website successful.
By the end of this guide, you will have a fully functional WordPress website and the confidence to build and customize it without any confusion.
1. What Is WordPress?
Before learning How to Install WordPress Step by Step, it’s important to understand what WordPress is. WordPress is the world’s most popular Content Management System (CMS), allowing you to create and manage websites without writing complex code. Whether you want to build a personal blog, a business website, a portfolio, a news site, or an online store, WordPress simplifies the entire process and makes it user-friendly for beginners.
Initially launched as a blogging platform, WordPress has evolved into a powerful website-building platform that powers millions of websites worldwide. Its user-friendly dashboard, vast collection of free and premium themes, and extensive library of plugins make it easy to customize your website to suit your specific needs.
The biggest advantage of WordPress is its flexibility. Even without technical knowledge, you can create a professional website with just a few clicks. That is why bloggers, small businesses, freelancers, and large corporations alike rely on it.
Before learning how to install WordPress step-by-step, it is important to understand why so many people choose WordPress over other website builders. It gives you complete control over your website, offers excellent SEO features, and allows your site to scale as your business or blog grows.
If you are planning to create your first website, learning how to install WordPress step-by-step is the best way to get started. Once WordPress is installed, you can easily select themes, install useful plugins, publish content, and customize your website without any coding experience.
💡 Did You Know? :
More than 40% of all websites on the internet are powered by WordPress, making it the world’s most popular Content Management System (CMS). From personal blogs and business websites to online stores and news portals, millions of people trust WordPress because it’s flexible, beginner-friendly, and highly customizable.
2. WordPress.org vs WordPress.com: What's the Difference?
Many beginners think WordPress.org and WordPress.com are the same, but they are actually two different platforms. Before learning How to Install WordPress Step by Step, it’s important to understand the difference between them so you can choose the right platform for your website.
WordPress.org is a self-hosted platform that gives you complete control over your website. You need to purchase your own domain name and web hosting, but in return, you can install any theme or plugin, customize your website without limitations, improve your SEO, and monetize your content however you like. This is the platform used by most professional bloggers, businesses, and affiliate marketers.
On the other hand, WordPress.com is a hosted service where WordPress manages the technical setup for you. It’s easy to get started, but the free plan comes with limited customization, restricted plugin access, and fewer monetization options. To unlock advanced features, you’ll need to upgrade to a paid plan.
If your goal is to build a professional blog, business website, or affiliate website, WordPress.org is the better choice. That’s why this How to Install WordPress Step by Step guide focuses on WordPress.org, as it offers complete freedom, better SEO flexibility, and unlimited growth opportunities.
Feature
WordPress.org
WordPress.com
Hosting
Requires your own hosting
Hosting is included
Domain Name
Use your own custom domain
Free plan uses a subdomain
Themes & Plugins
Full access
Limited on free plans
Customization
Complete control
Limited customization
Monetization
No restrictions
Limited on lower plans
Best For
Bloggers, businesses, affiliate marketers
Personal blogs and hobby websites
💡 Pro Tip: If you’re planning to follow this guide and create a long-term website, choose WordPress.org. It’s the best option for anyone who wants full control, better SEO performance, and unlimited growth opportunities.
3. Why Should You Install WordPress?
If you are thinking about building a website, you might wonder why millions of people choose WordPress over other website builders. The answer is simple—WordPress is flexible, easy to use, and suitable for almost any type of website. Before you learn How to Install WordPress Step by Step, it’s important to understand why WordPress is the preferred choice for beginners and professionals alike.
Whether you are starting a personal blog, a business website, an online portfolio, or an e-commerce store, WordPress provides all the tools you need to create a professional website without any coding.
Before learning “how to install WordPress step-by-step”, it is important to understand the benefits of using it. Choosing the right platform from the start can save you time, money, and effort as your website grows.
Here are some key reasons why WordPress is the top choice for both beginners and professionals:
1. Beginner-Friendly
The WordPress dashboard is intuitive and easy to use, allowing anyone—even without technical knowledge—to build and manage a website. Once you complete How to Install WordPress Step by Step, you’ll use the WordPress dashboard to publish pages, write blog posts, upload images, and customize your website with just a few clicks.
2. Completely Customizable
With thousands of free and premium themes and plugins available, you can easily change your website’s design and add new features—such as contact forms, image galleries, SEO tools, and online stores—without writing a single line of code.
3. SEO-Friendly
WordPress is built with SEO in mind. It integrates seamlessly with plugins like Rank Math, helping you optimize your content, improve your visibility on search engines, and drive more organic traffic.
4. Mobile Responsive
Most modern WordPress themes automatically adjust to different screen sizes, ensuring your website looks great on desktops, tablets, and smartphones. After completing How to Install WordPress Step by Step, your responsive theme will automatically provide a great experience across all devices.
5. Secure and Regularly Updated
WordPress is regularly updated to enhance security, performance, and compatibility. Even after completing How to Install WordPress Step by Step, you should regularly update your WordPress version, themes, and plugins to maintain a secure and reliable website.
6. Excellent for Any Type of Website
Whether you want to create a blog, business website, portfolio, online store, news site, or educational platform, WordPress gives you the freedom to build a website tailored to your specific needs.
7. Support from a Large Community
The WordPress online community is one of the largest in the world. If you need help while learning How to Install WordPress Step by Step, you’ll find thousands of tutorials, guides, videos, and support forums that can help you solve problems quickly and continue building your website with confidence.
💡 Key Takeaway: Once you understand these benefits, you will see why millions of website owners trust WordPress. Now, we will guide you through the “step-by-step process of installing WordPress” and show you what you need before getting started.
4. Things You Need Before Installing WordPress
Before learning “how to install WordPress step-by-step, it is important to have a few essentials ready. Having everything prepared in advance makes the installation process faster, easier, and completely stress-free. Whether you are creating your first blog, a business website, or an online store, you will need these basics before installing WordPress.
1. Domain Name
A domain name is your website’s unique address on the internet, such as “yourwebsite.com”. Choose a domain name that is simple, easy to remember, and relevant to your website or business.
2. Web Hosting
Before you begin How to Install WordPress Step by Step, you first need reliable web hosting.Web hosting is the service that stores your website’s files and makes them accessible on the internet. Without hosting, you cannot install or run WordPress. Choosing a reliable hosting provider is one of the most important decisions, as it directly impacts your website’s speed, security, uptime, and overall performance.
If you haven’t purchased hosting yet, I recommend reading my detailed hosting guide before proceeding with this tutorial. In that guide, I compare affordable WordPress hosting options, discuss their features, pricing, and performance, and offer personal recommendations to help beginners choose the right hosting provider.
👉 Read this guide before installing WordPress:
Best Affordable WordPress Hosting Deals – Starting at Rs. 55/month
3. SSL Certificate
An SSL certificate keeps your website secure and protects the connection between your site and its visitors. It also changes your website’s URL from “HTTP” to “HTTPS”, which builds trust and improves SEO. Most hosting providers offer a free SSL certificate with their hosting plans.
4. Access to Hosting Dashboard
You will need access to your hosting account (such as cPanel or your hosting provider’s dashboard). This is where you will install WordPress, manage files, and configure your website
5. Website Information
Before starting the installation, have the following information ready:
* Website name
* Website tagline (optional)
* Admin username
* Strong password
* Admin email address
Having this information ready will make the “step-by-step WordPress installation” much easier, allowing you to complete the setup without any interruptions.
6. Stable Internet Connection
A stable internet connection is essential when following How to Install WordPress Step by Step. A reliable internet connection ensures that the installation process completes smoothly without interruptions or failed requests.
✅ Quick Checklist Before Installing WordPress
Before starting the installation process, ensure you have the following:
✔️ A domain name
✔️ Reliable web hosting
✔️ Free SSL certificate
✔️ Access to your hosting dashboard
✔️ Website name and admin login details
✔️ Stable internet connection
💡 Pro Tip: Spending a few minutes preparing these essentials will save you time and help you avoid common mistakes during installation. Once everything is ready, you can proceed to the next section without confusion and follow the steps to “install WordPress”.
💡 Recommended: for Beginners: If you don’t have hosting yet, I recommend reading Best Cheap WordPress Hosting Deals – Starting From Rs.55/mo before installing WordPress. Choosing the right hosting provider from the beginning can improve your website’s speed, security, and overall performance.
5.How to Install WordPress Step by Step :
Now that you have your domain name, web hosting, and all the essentials ready, let’s learn how to install WordPress step-by-step. The good news is that installing WordPress isn’t as difficult as beginners often think. Most hosting companies offer ‘one-click installation’ tools, allowing you to launch your website in just a few minutes without writing any code.
If you haven’t purchased a hosting plan yet, I highly recommend reading the guide on Best Cheap WordPress Hosting Deals – Starting From Rs.55/mo before proceeding. This will help you compare affordable hosting options, understand their features, and choose the best plan for your website.
🚀 Must Read
Once you have selected a hosting provider and completed your purchase, you are ready to begin the WordPress installation process. Simply follow each step carefully, and by the end of this guide, you will have a fully functional WordPress website ready for customization.
Step 1: Log in to your hosting account :
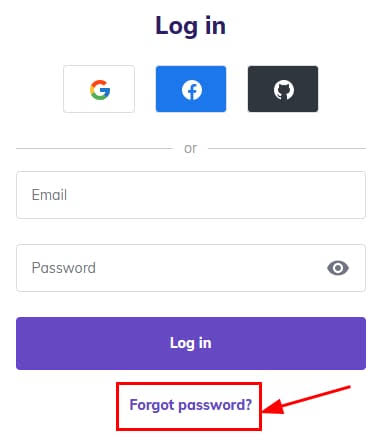
The first step in installing WordPress is logging in to your hosting account. Visit your hosting provider’s website and sign in using the email address and password you created when purchasing the hosting plan.
After logging in, you will see your hosting dashboard, where you can manage your domain, hosting, email accounts, SSL certificates, and other website settings.
Step 2: Open your hosting dashboard or cPanel :
Once you have logged into your hosting account, navigate to your hosting dashboard. Depending on your hosting provider, this could be cPanel, hPanel, Plesk, or another custom control panel.
Here, you will find all the tools necessary to manage your website, such as the WordPress installer, file manager, databases, SSL settings, and backups.
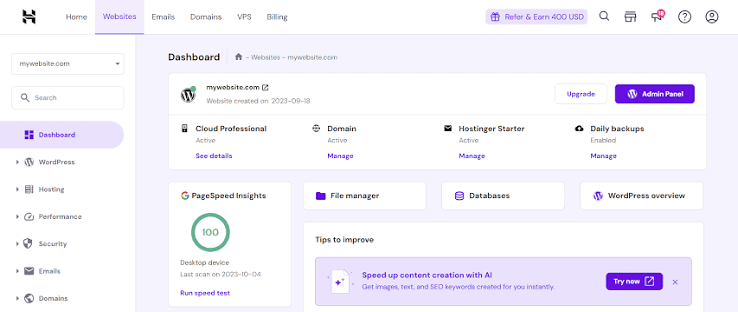
Familiarize yourself with the dashboard before moving on to the next step.
Step 3: Find the WordPress Installer :
Once you have logged into your hosting account, navigate to your hosting dashboard. Depending on yNow, locate the WordPress installer or auto-installer option. Most hosting providers offer a one-click WordPress installation feature, making the process fast and easy for beginners.
You can find this under sections such as:
- WordPress
- Auto Installer
- Website
- CMS Installer.
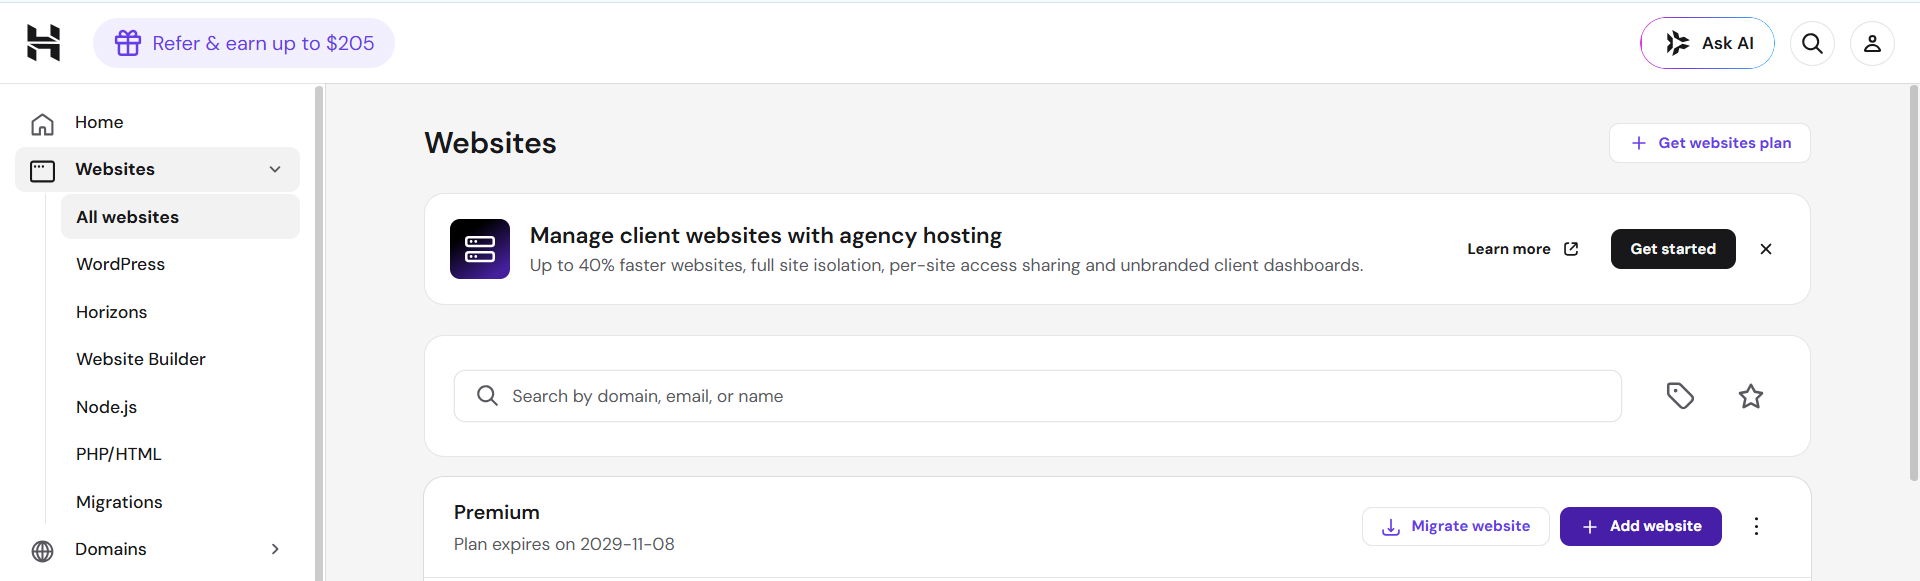
Click on the Add website to proceed.
💡 Tip: If you are using Hostinger, go to Websites → Add website → WordPress.
Step 4: Click the 'Install' button :
After opening the WordPress installer, you will see the ‘Install’ button.
Click the ‘Install’ button to start the setup process.
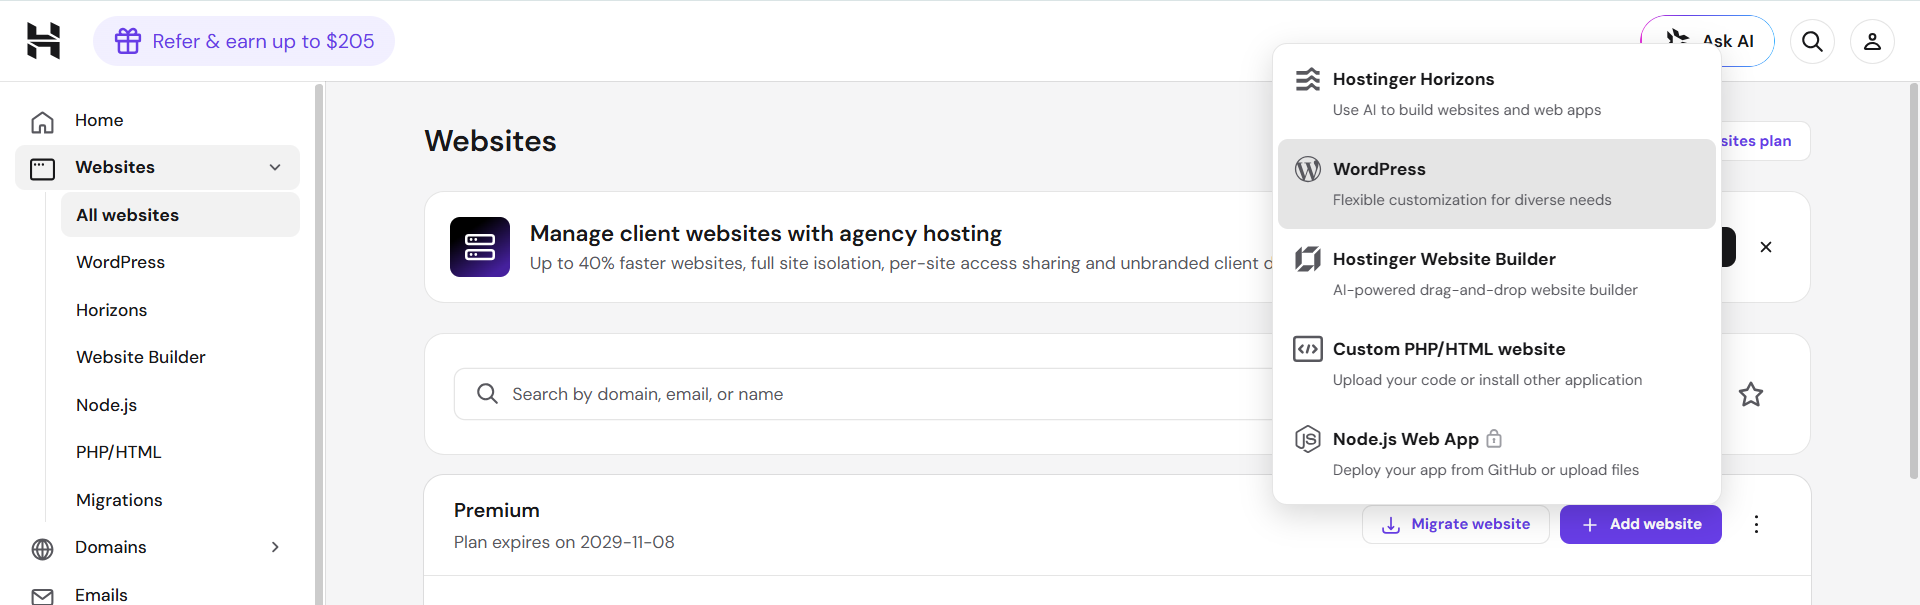
You do not need any coding knowledge, as the installer will automatically create the necessary files and configure WordPress for your website.
This is one reason why learning to install WordPress step-by-step has become much easier today compared to a few years ago.
Step 5: Enter your website details :
Next, you will need to provide some basic information about your website.
Carefully fill in the details below:
- Website Title
- Website Tagline (optional)
- Language
- Installation Directory (leave this blank if you want WordPress on your main domain)
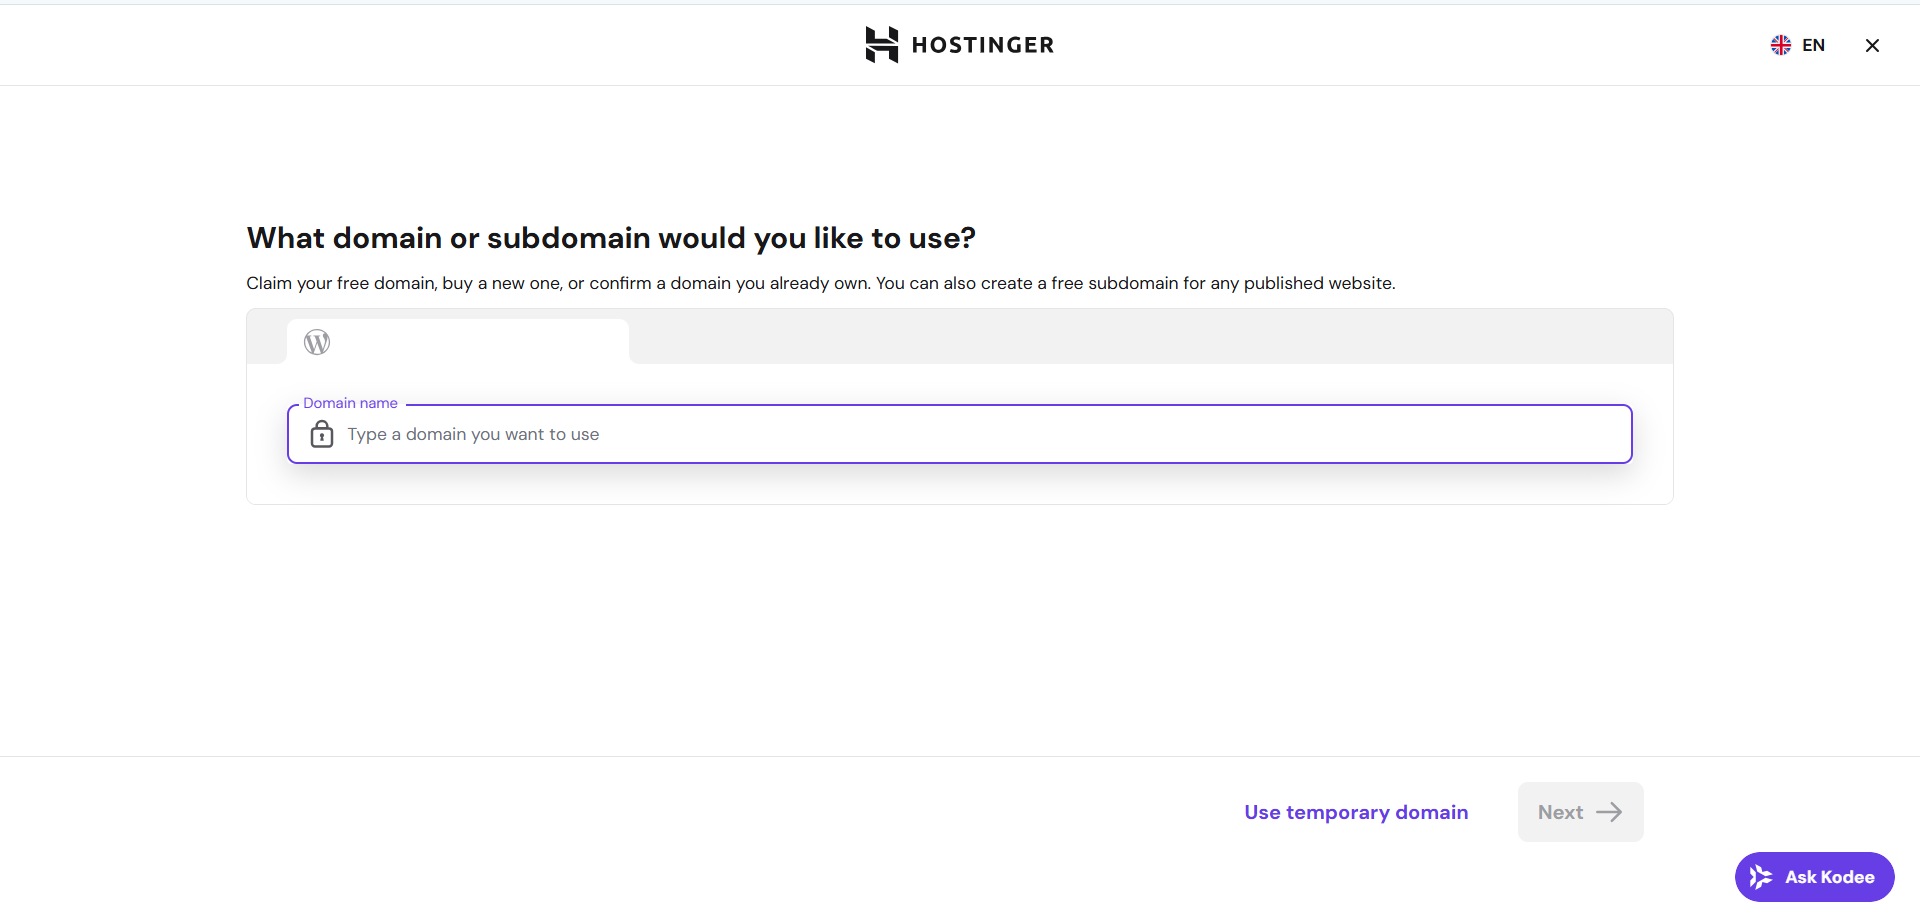
Don’t rush while filling in these details, as they can affect how your website appears to visitors and search engines.
💡 Don’t worry! You can change all these settings later from your WordPress dashboard.
Step 6: Create your WordPress admin account :
This is one of the most important steps.
Enter the following details to create your administrator account:
- Admin username
- Strong password
- Admin email address
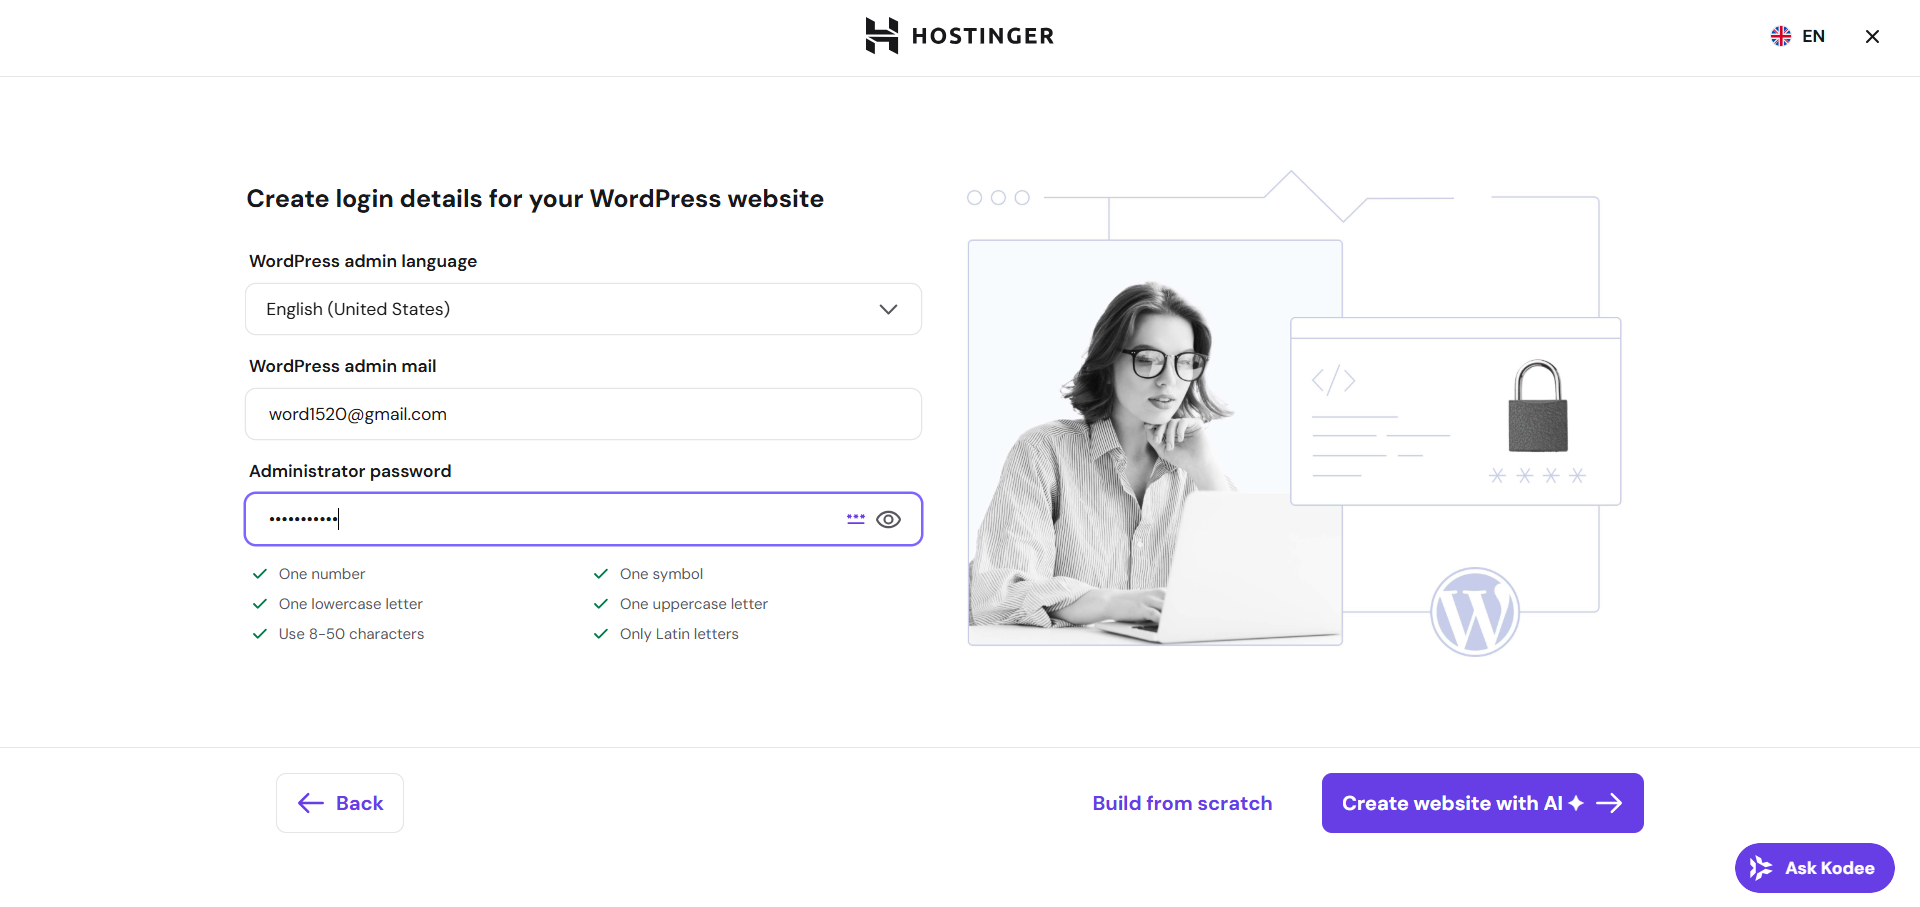
Choose a unique username and a strong password that includes uppercase letters, lowercase letters, numbers, and special characters.
Avoid using simple usernames like ‘admin’, as they can increase the risk of unauthorized access to your website.
Step 7: Complete the installation :
After checking all your details, click on the ‘Install’ button.
Now the installer will automatically create your WordPress website.
This usually takes less than a minute.
Once the installation is complete, you’ll find two important links:
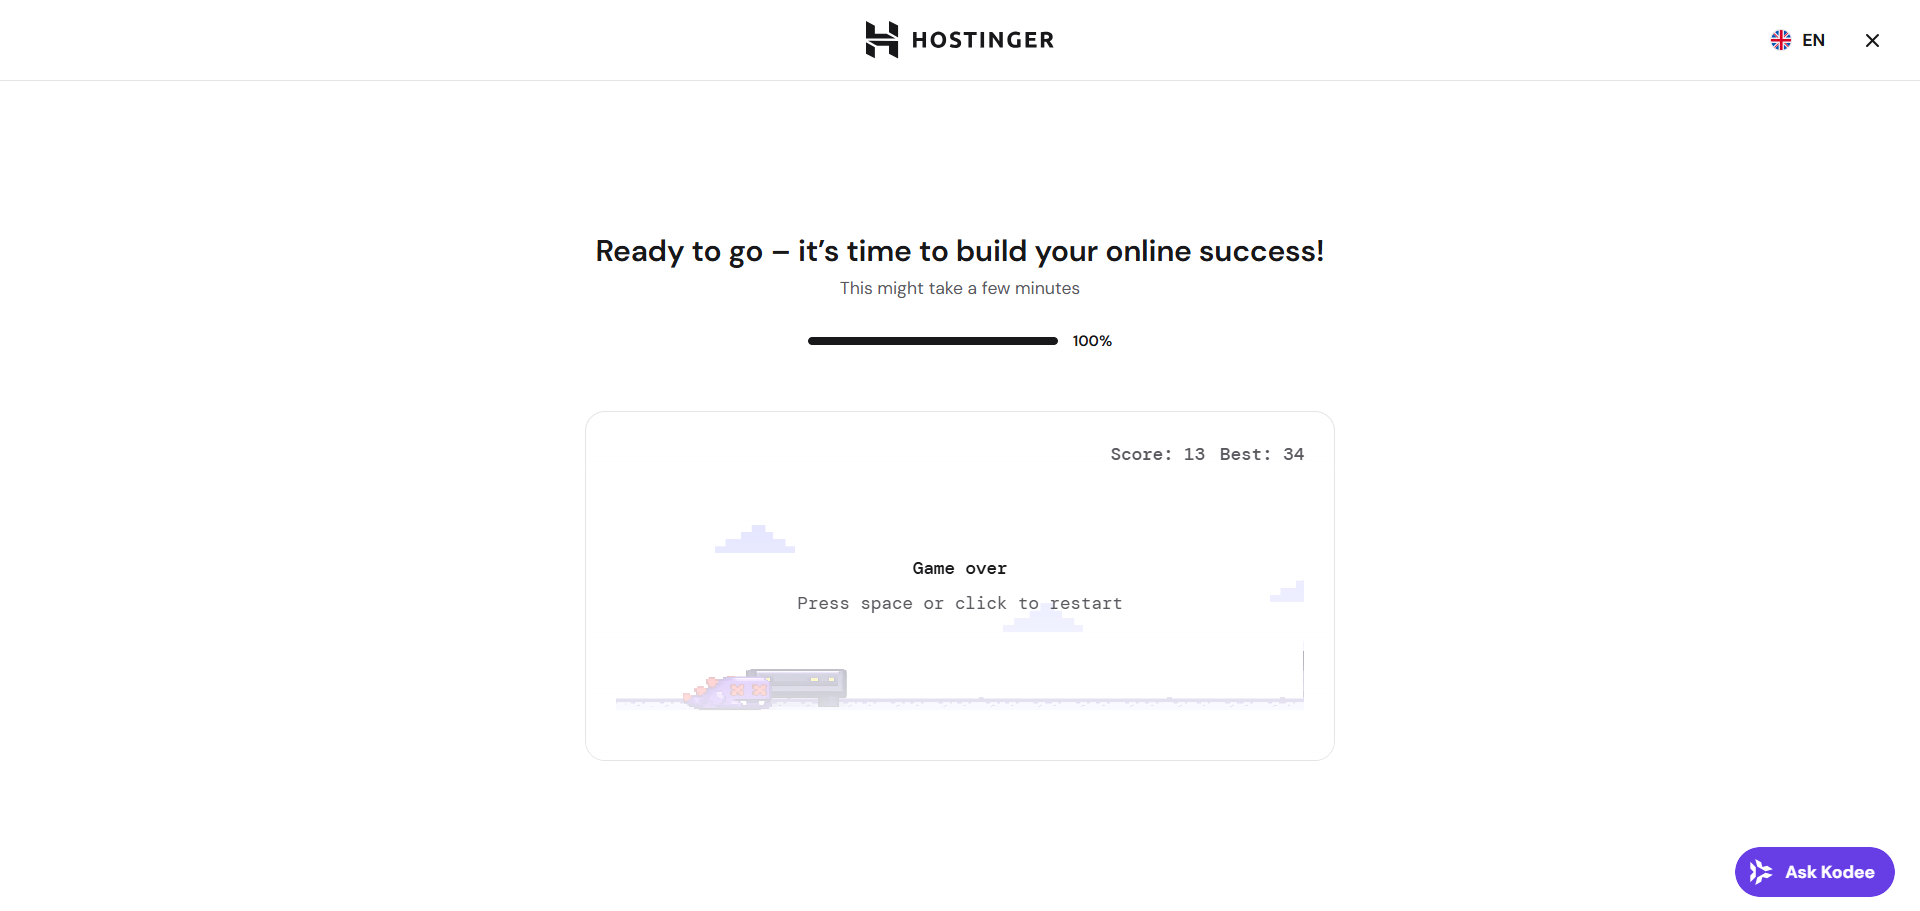
URL of your website
URL of your WordPress admin login
Save these links for future use as you will need them whenever you want to manage your website.
Congratulations! You have successfully completed the step-by-step installation process of WordPress.
Step 8: Log in to your WordPress dashboard :
The final step is to log into your WordPress dashboard.
Open your browser and go to:
This is the website link
https://yourdomain.com
And this is the WordPress admin panel link
https://yourdomain.com/wp-admin
Whatever domain name you have taken, write [Your Domain] there and enter the password, then click on Login.
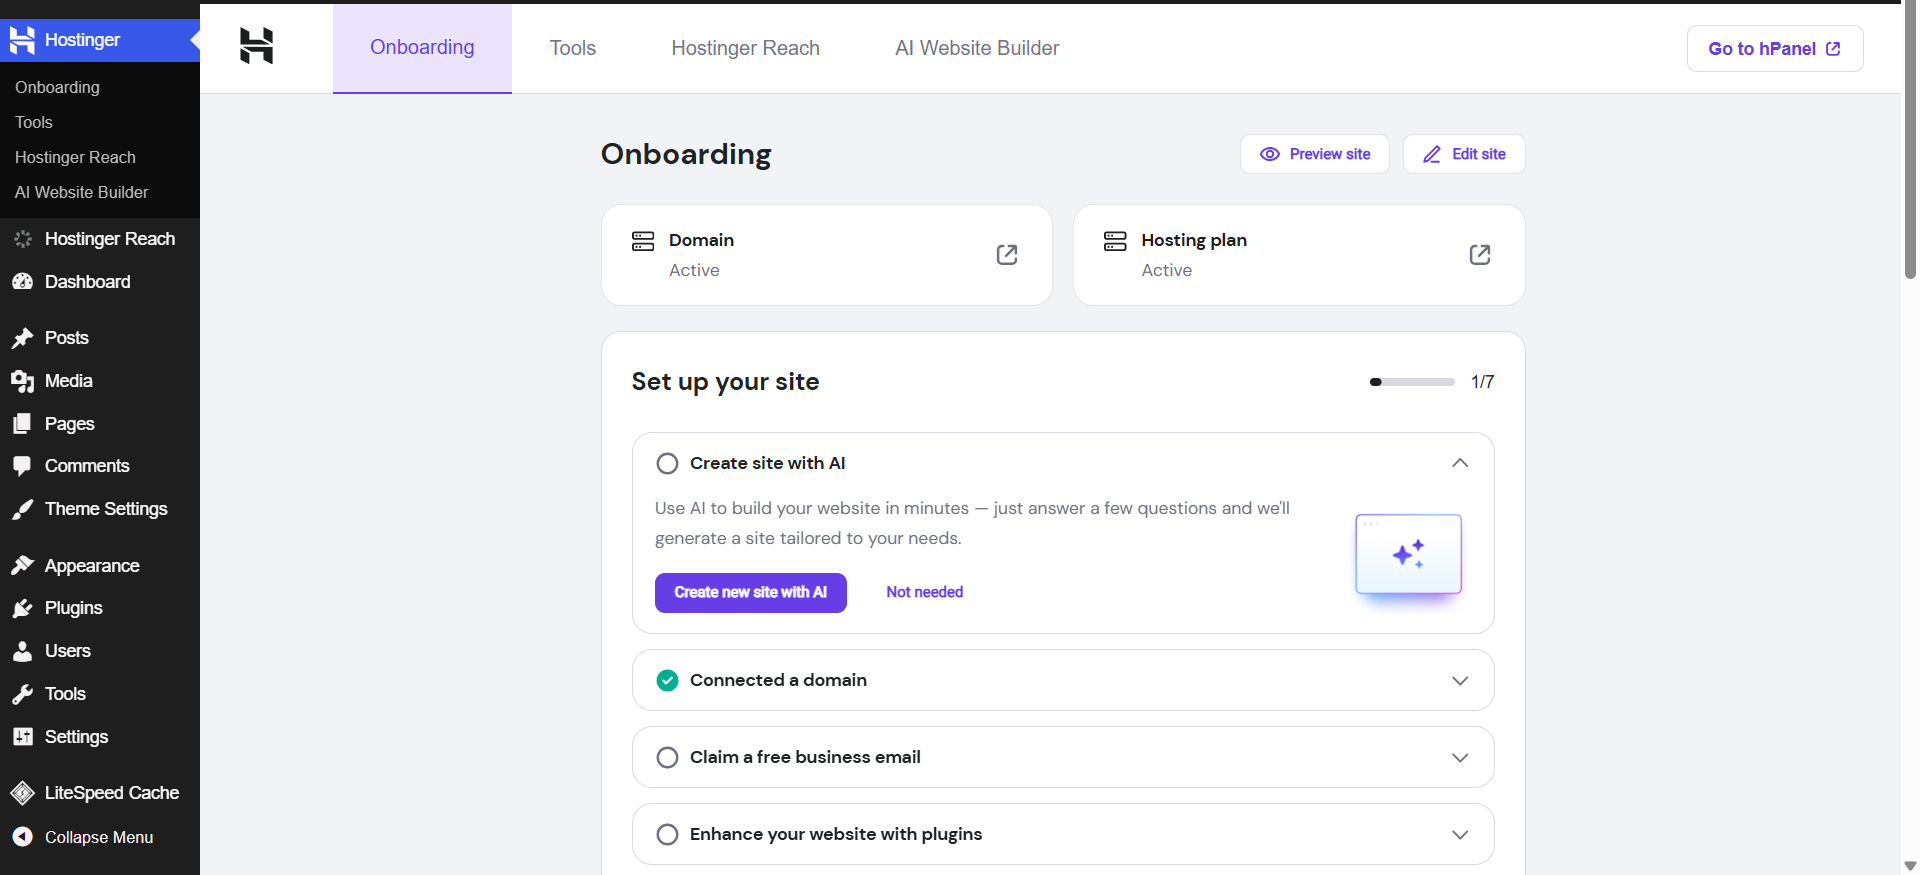
After signing in, you’ll see the WordPress dashboard, where you can:
- create blog post
- add new pages
- install theme
- install plugins
- Optimize your website
Manage Settings
★Congratulations! You have successfully learned how to install WordPress step by step and your website is now ready to customize and publish your first piece of content.
💡 Pro Tip: Before you start customizing your website, make sure you choose a reliable hosting provider. If you’re still comparing hosting options, don’t miss my guide to the best cheap WordPress hosting deals – starting at Rs.55/month. It includes affordable plans, features, and tips to help beginners choose the right hosting for their WordPress website.
6. How to Log in to Your WordPress Dashboard :
Congratulations! If you have successfully followed How to Install WordPress Step by Step, your WordPress website is now live and ready to use. The next step is to log into your WordPress dashboard, which is the control panel where you’ll manage every aspect of your website.
From the dashboard, you can create blog posts, publish pages, install themes and plugins, customize the appearance of your website, manage comments and set up important settings. Can do. In simple terms, this is where you will create and enhance your WordPress website.
Step 1: Open the WordPress Login Page :
Open your web browser and type the following URL:
https://yourdomain.com/wp-admin
or
https://yourdomain.com/wp-login.php
Replace yourdomain.com with your actual website domain.
For example:
https://example.com/wp-admin
Step 2: Enter your login details :
On the login page, enter the following information:
Username or email address
password
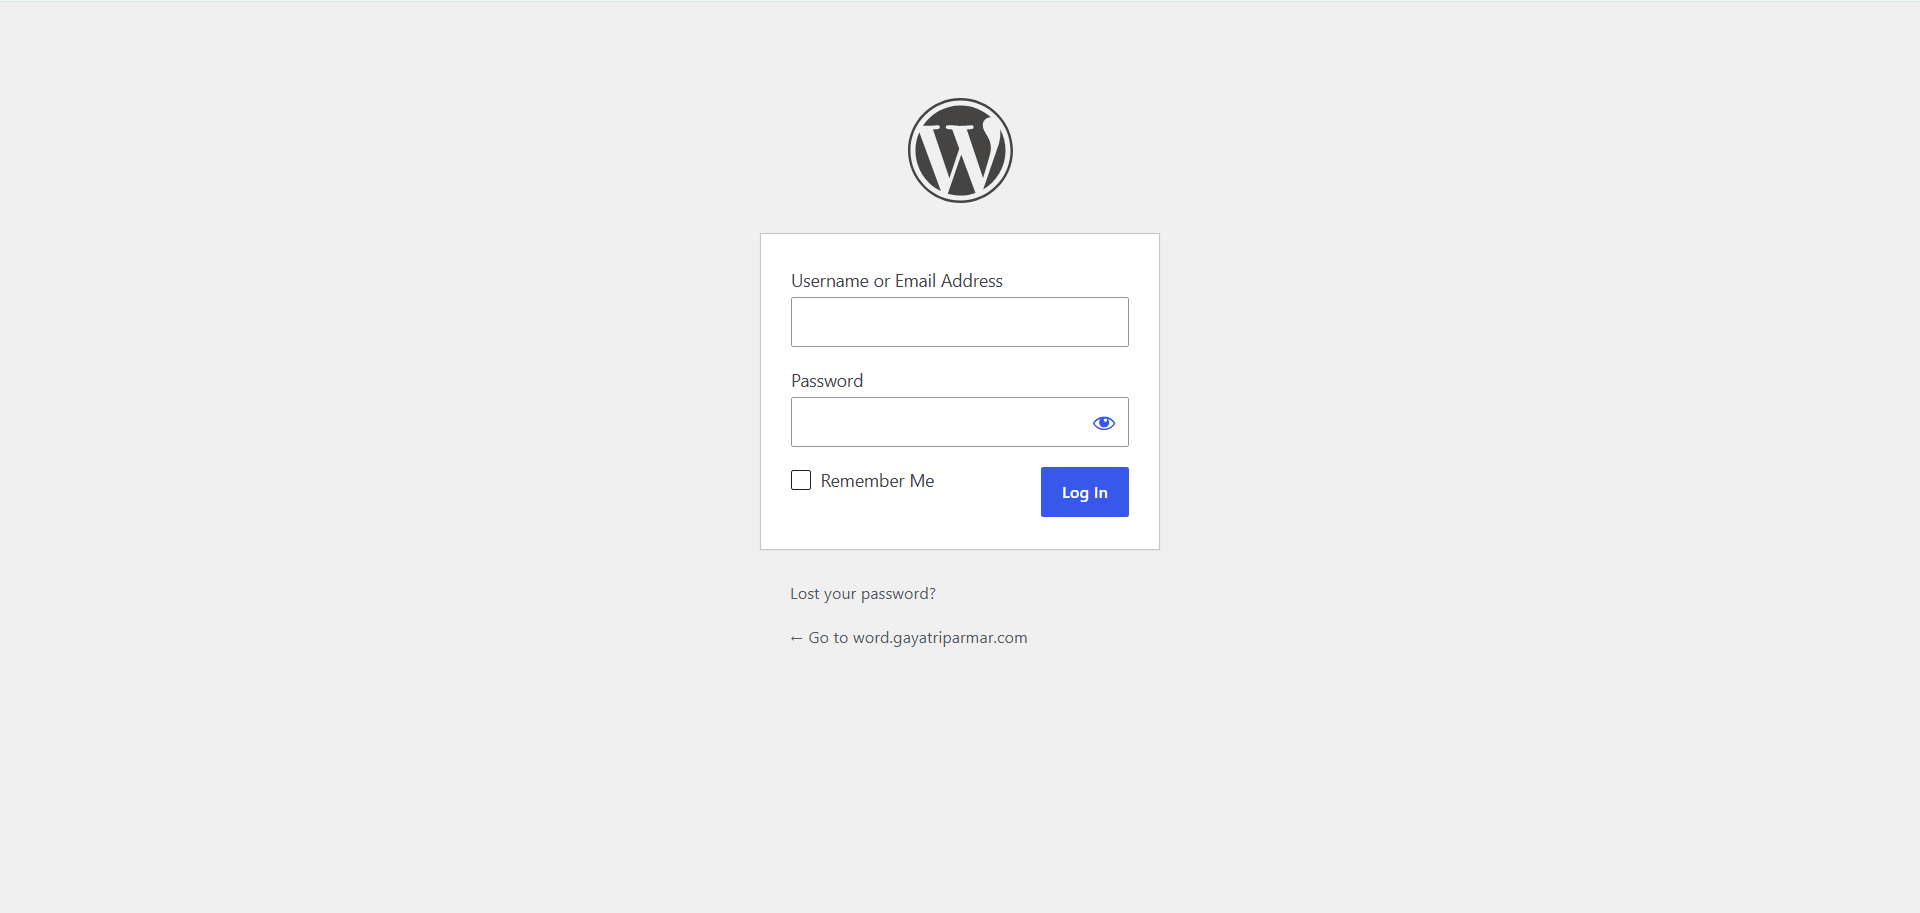
These are the same login details that you created during the WordPress installation process.
💡 Tip: If you are using your personal computer, you can check the Remember me option to stay logged in for future visits
Step 3: Click the "Log In" Button
After entering your username and password, click the Log In button.
If your details are correct, you’ll be redirected to the WordPress Dashboard, where you can start managing your website immediately
What can you do from the WordPress dashboard?
Once you log in, you will have complete control over your website. Here are some of the most important things you can do:
- Write and publish blog posts
- create new pages
- Install and Customize WordPress Theme
- Add useful plugins
- Upload Images and Media Files
- Manage Comments
- Change website settings
- Monitor website updates and security
As you learn how to install WordPress step by step, you’ll spend most of your time inside this dashboard as it is the central location for managing your entire website.
Forgot your password?
Don’t worry—it happens to everyone.
Even after completing How to Install WordPress Step by Step, you may occasionally forget your login password. If you forget your password, simply click the Lost your password? link on the login page. Enter your registered email address, and WordPress will send you a password reset link so you can regain access to your website.
💡 Pro Tip:
After completing How to Install WordPress Step by Step, bookmark your /wp-admin login page in your browser. This will save time and make it easier to access your WordPress dashboard whenever you want to update your website or publish new content.
If you haven’t chosen a hosting provider yet or you’re still comparing affordable options, don’t miss my detailed guide:
Best cheap WordPress hosting deals – Starting from Rs.55/month
Once you’re logged in to your dashboard, you’re ready to customize your website, install a theme, add the necessary plugins, and publish your first blog post.
7. Essential Settings After Installing WordPress :
Congratulations! You have successfully completed How to Install WordPress Step by Step, and your website is now live. However, before you start publishing blog posts or customizing your website, there are some important settings you should update. These settings will improve your website’s security, SEO, user experience, and overall performance from day one.
Let us learn about the essential WordPress settings that every beginner should confirm after installation.
1. Change your site title and tagline
The title of your site is the name of your website, while the tagline is a short description that tells visitors what your website is about.
To update them:
Dashboard → Settings → General
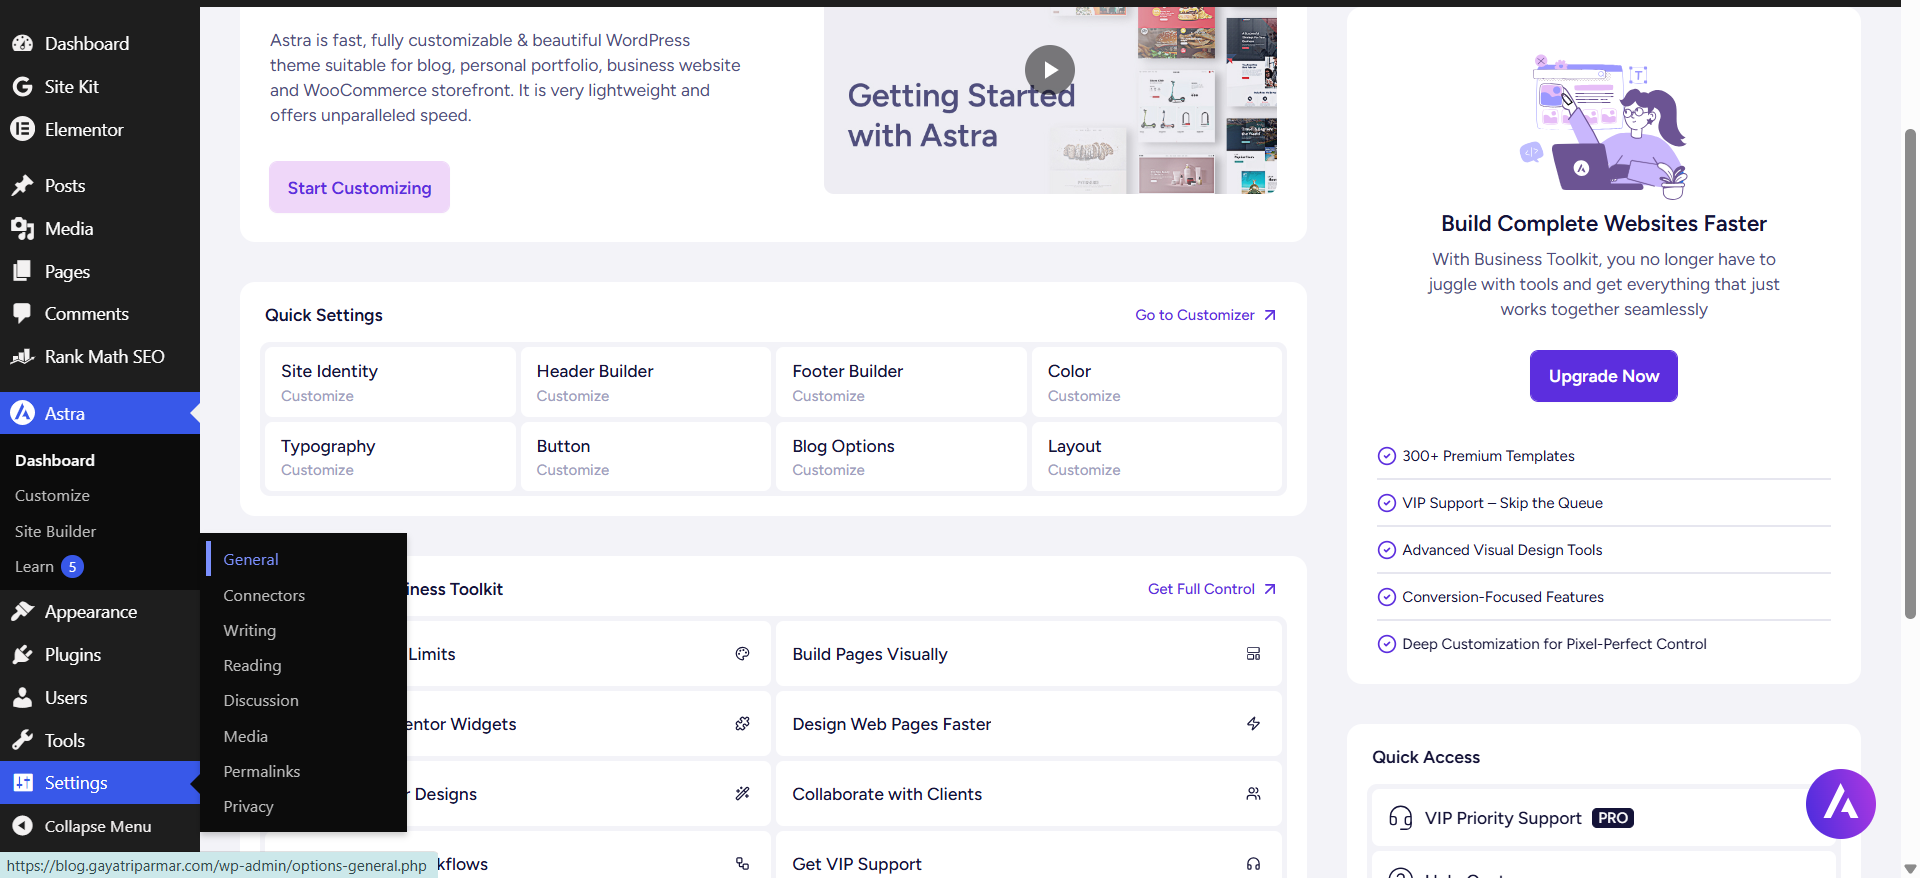
Choose a clear and professional website title that represents your brand or topic.
2. Update Permalink Structure
Permalinks determine how your website’s URLs will appear.
Go to:
Dashboard → Settings → Permalinks
Select Post Name as it creates clean, SEO-friendly URLs that are easy to understand for both users and search engines.
For example:
❌ yourwebsite.com/?p=123
✅ yourwebsite.com/how-to-install-wordpress-step-by-step
3. Set your time zone
Setting the correct time zone ensures that your blog posts are published at the right time.
Go to:
Dashboard → Settings → General
Select your country and preferred time zone.
4. Delete Default Content
After completing How to Install WordPress Step by Step, a new WordPress installation usually includes a sample post, a sample page, and a “Hello World!” comment.
Remove these default items before launching your website to keep everything clean and professional.
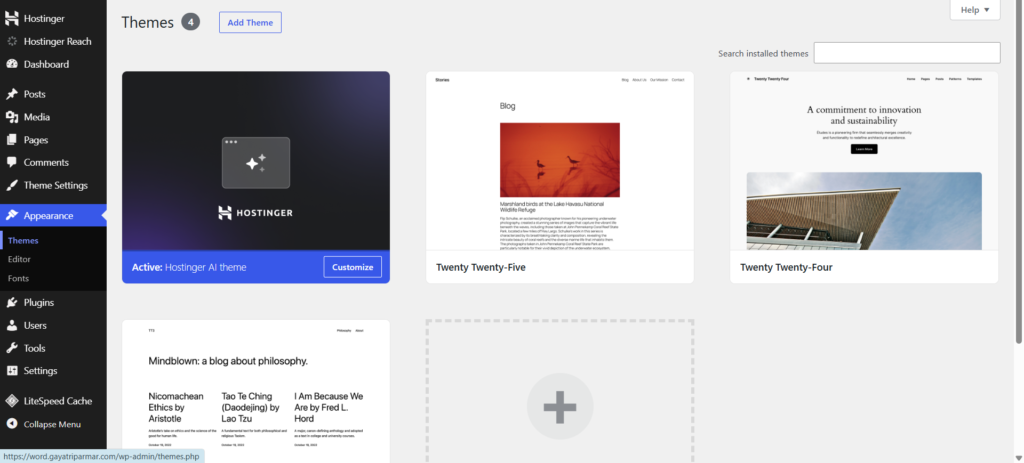
5. Install a Lightweight Theme
Choose a fast, responsive, and SEO-friendly WordPress theme.
Popular beginner-friendly themes include:
astra
generatepress
rhythm
hello elementor
A light theme helps improve website speed and provides a better experience to your visitors.
6. Install Required Plugins
Plugins add additional features to your website without the need for coding.
Some useful plugins for beginners include:
- Elemator
- rank math seo
- litespeed cache
- wpfforms
Install only the plugins you really need as too many plugins can slow down your website.
7. Enable SSL (HTTPS)
If your website still shows HTTP, enable your SSL certificate from your hosting dashboard.
A secure HTTPS connection protects visitor data, builds trust and is also an important ranking factor for Google.
8. Create important website pages :
Before publishing your first blog post, first online store web, or any website, create the essential pages every professional website should have:
- Home
- about us
- contact us
- Privacy Policy
- terms and conditions
- Disclaimer
These pages help build trust among your visitors and are important for affiliate marketing and AdSense approval.
9. Check Your Website on Mobile Devices
Most visitors browse websites using smartphones.
How to Install WordPress Step by Step After completing, open your website on mobile phones and tablets to make sure everything looks clean, loads properly and is easy to navigate.
10. Keep WordPress updated
Update your WordPress version, themes, and plugins regularly.
Updates provide new features, improve performance, and protect your website from security vulnerabilities.
💡 Pro Tip: Before updating plugins or themes, create a backup of your website so you can restore it if anything goes wrong.
final tip :
Completing how to install WordPress step by step is just the beginning of your website journey. By implementing these essential settings immediately after installation, you will lay a strong foundation for better SEO, better security, faster performance, and a seamless experience for both you and your visitors.
8. Common WordPress Installation Problems and Solutions :
Even if you carefully follow how to install WordPress step by step, you may still face some minor issues during or after the installation process. Don’t worry—most of these problems are easy to fix and only take a few minutes.
Below are some of the most common WordPress installation issues with simple solutions to help your website run smoothly.
1. Unable to Access WordPress Login Page
Problem:
/wp-admin or /wp-login.php page does not open after installing WordPress.
Solution:
Make sure you are using the correct website URL.
Check if WordPress was installed on the correct domain.
Clear your browser cache and try again.
Wait a few minutes if your domain has recently been linked to your hosting account
2. Database connection error
Problem:
You see the message:
“Error establishing database connection.”
Solution:
Verify that your database details are correct.
Check if your hosting server is working properly.
If the problem persists, contact your hosting provider.
3. White Screen of Death
Problem:
Your website only displays a blank white screen.
Solution:
Disable recently installed plugins.
Switch to a default WordPress theme.
Increase the PHP memory limit if required.
Clear your website cache.
4. SSL or HTTPS Not Working
Problem:
Your website still loads with HTTP instead of HTTPS.
Solution:
Enable the free SSL certificate from your hosting dashboard.
Update your WordPress Address (URL) and Site Address (URL) to HTTPS.
Clear your browser and website cache.
5. Installation Stuck or Failed
Problem:
The installation process stops before it finishes.
Solution:
Refresh the installer page.
Check your internet connection.
Ensure your hosting account has enough resources.
Try installing WordPress again using the Auto Installer.
6. Forgot Your WordPress Password
Problem:
You can’t log in because you’ve forgotten your password.
Solution:
Click Lost your password? on the login page.
Enter your registered email address.
Follow the password reset instructions sent to your email.
7. Plugin or Theme Compatibility Issues
Problem:
Your website stops working after installing a plugin or theme.
Solution:
Deactivate the recently installed plugin or theme.
Update WordPress, plugins, and themes to their latest versions.
Use plugins only from trusted developers.
💡Tips to Avoid WordPress Installation Problems
You can prevent most installation problems by following these simple best practices:
Use a reliable hosting provider.
Keep WordPress, themes, and plugins updated.
Install only trusted plugins.
Make regular website backups.
Enable SSL before launching your website.
Use strong login credentials for better security.
Following these tips when learning how to install WordPress step by step will help you avoid many common problems and keep your website running smoothly.
final tip :
Every beginner faces small challenges when creating their first website, and this is completely normal. As long as you carefully follow How to Install WordPress Step by Step and choose a reliable hosting provider, most installation issues can be resolved quickly. If you ever get stuck, don’t panic—identify the problem, apply the recommended solution, and you’ll be back building your website in no time.
9. Frequently Asked Questions (FAQ) :
If you’re still unsure about How to Install WordPress Step by Step, don’t worry. Below are answers to some of the most common questions beginners ask before and after installing WordPress.
1. Is it free to install WordPress?
Yes, WordPress itself is completely free to download and install. However, you will need a domain name and a web hosting plan to make your website accessible on the Internet.
2. Do I need coding knowledge to install WordPress?
No, you do not need any coding or technical experience. Most hosting providers offer one-click installers, making it quite simple for beginners to install WordPress step by step.
3. How long does it take to install WordPress?
If you’re using the one-click installer, WordPress can usually install in 1-3 minutes. Manual installation may take a little longer depending on your experience.
4. Can I install WordPress without web hosting?
You can install WordPress locally on your computer for learning or testing purposes. However, if you want your website to be visible online, you will need a domain name and reliable web hosting.
5. What is the WordPress login URL?
After installation, you can access your WordPress Dashboard by visiting:
https://yourdomain.com/wp-admin
or
https://yourdomain.com/wp-login.php
Replace yourdomain.com with your actual domain name.
6. Which hosting is best for beginners?
If you want a beginner-friendly hosting provider with fast performance, free SSL, one-click WordPress installation, regular backups, and reliable customer support, you can check it out by clicking the button below.
👉 Best cheap WordPress hosting deals – Starting from Rs.55/month
7. Can I change my WordPress theme later?
Yes. You can change your WordPress theme at any time without reinstalling WordPress. However, some theme-specific settings may need to be configured again after switching.
8. What should I do after installing WordPress?
After completing How to Install WordPress Step by Step, you should:
Update your website title and tagline.
Change the permalink structure.(Post Name:)
Install a lightweight theme.
Add essential plugins.
Enable SSL (HTTPS).
Create important pages such as About Us, Privacy Policy, Contact Us, Terms & Conditions, and Disclaimer.
Publish your first blog post.
9. Is WordPress good for SEO?
Yes. WordPress is one of the most SEO-friendly website platforms available. With plugins like Rank Math and proper optimization, you can improve your website’s visibility in search engines and attract more organic traffic.
10. Can I build an online store with WordPress?
Absolutely! By installing plugins like WooCommerce, you can easily create an online store to sell physical or digital products, manage payments, and track orders
💡 Final FAQ Tip :
Learning How to Install WordPress Step by Step is the first milestone in building your website. Once WordPress is installed, you can start customizing your site, publishing valuable content, improving your SEO, and growing your online presence with confidence.
10. Final Thoughts :
Learning How to Install WordPress Step by Step may seem challenging at first, but once you understand the process, it’s much easier than most beginners expect. With the right hosting provider and a little guidance, you can install WordPress in just a few minutes and start building your website with confidence.
In this How to Install WordPress Step by Step guide, we’ve covered everything from understanding WordPress and choosing the right platform to installing WordPress, logging into your dashboard, configuring essential settings, troubleshooting common issues, and answering the most frequently asked questions. By following these steps carefully, you’ll have a strong foundation for creating a fast, secure, and professional WordPress website.
Remember, installing WordPress is only the beginning of your website-building journey. The real success comes from regularly publishing helpful content, improving your website’s SEO, keeping your plugins and themes updated, and continuously learning new skills. Every successful website started with the same first step—installing WordPress.
If you haven’t purchased hosting yet, choosing the right hosting provider is one of the most important decisions you’ll make. A reliable hosting service improves your website’s speed, security, uptime, and overall performance, making it easier to grow your blog or online business Choosing quality hosting is an essential part of How to Install WordPress Step by Step..
👉 Before you choose a hosting plan, don’t miss my complete guide:
Best Cheap WordPress Hosting Deals – Starting From Rs.55/mo
In this guide, I’ve compared beginner-friendly hosting plans, explained their features, pricing, performance, and shared tips to help you choose the best hosting for your website. It can save you both time and money while helping you make the right decision.