
Introduction :
If you want more control, dedicated resources, and better flexibility for your website, learning How to Use Hostinger VPS can be a useful step. A VPS gives you a dedicated virtual server environment where you can manage your website, server resources, applications, and other hosting settings with greater control than traditional shared hosting.
For beginners, using a VPS may seem technical at first, but Hostinger provides a user-friendly management environment that makes common server tasks easier to handle. Once your VPS is ready, you can access the server, manage websites, monitor resources, configure backups, and handle essential server settings from the available tools.
In this guide, we will explain How to Use Hostinger VPS step by step, starting with the basic setup and access process and then moving into everyday VPS management. Whether you are hosting a WordPress website or managing another web project, this guide will help you understand the main features and tasks involved in using a Hostinger VPS.
1. What Is Hostinger VPS?
Hostinger VPS is a virtual private server that provides a more isolated and flexible hosting environment for websites and online applications. Instead of sharing the same hosting environment with many other websites, a VPS gives you dedicated virtual resources within a virtualized server environment.
With a Hostinger VPS, you get greater control over your server environment, including the ability to manage applications, websites, resources, and important server settings. This makes VPS hosting useful for websites that need more control and flexibility than typical shared hosting can provide.
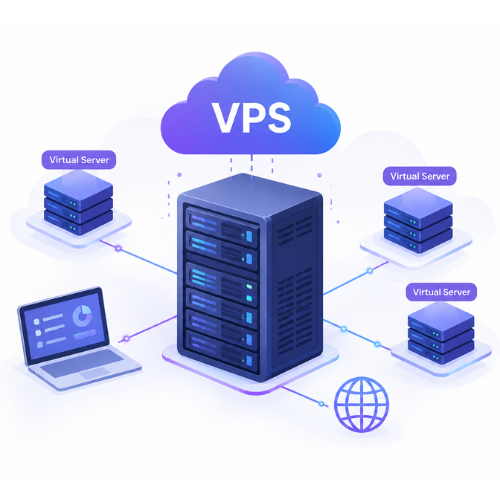
One of the main advantages of using a VPS is the ability to manage your hosting environment according to your website’s requirements. You can monitor resource usage, configure your applications, manage websites, create backups, and perform other server management tasks.
For users who are moving from shared hosting to a more flexible hosting environment, understanding How to Use Hostinger VPS is important. Once you understand the dashboard and basic server controls, managing your VPS becomes much easier.
2. How to Use Hostinger VPS – Getting Started
To start using Hostinger VPS, you first need to access your VPS account and configure the basic server settings. If you are new to VPS hosting, the server dashboard might seem a bit unfamiliar at first, but managing the VPS becomes very easy once the basic setup is complete.
You can view Hostinger VPS plans and choose the one that best suits your website’s needs.
Step 1: Log In to Your Hostinger Account
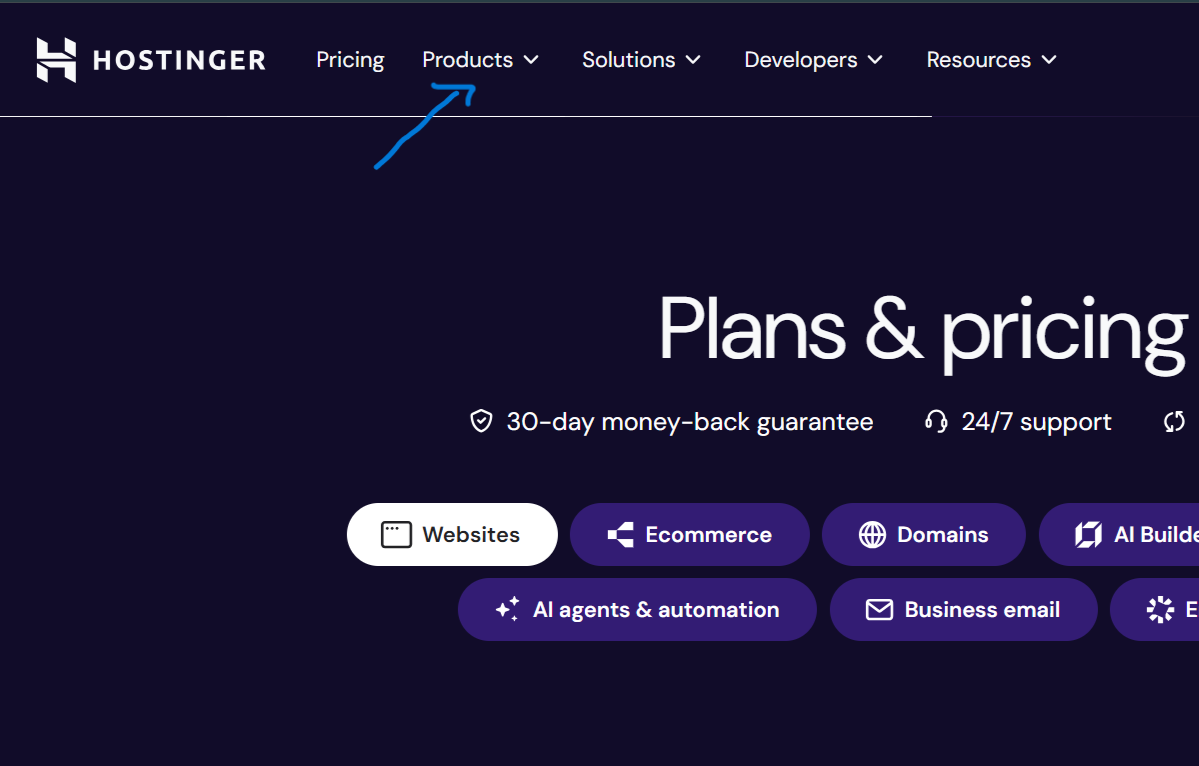
First, log in to your Hostinger account. Once you are logged in, look at the top header and click Products.
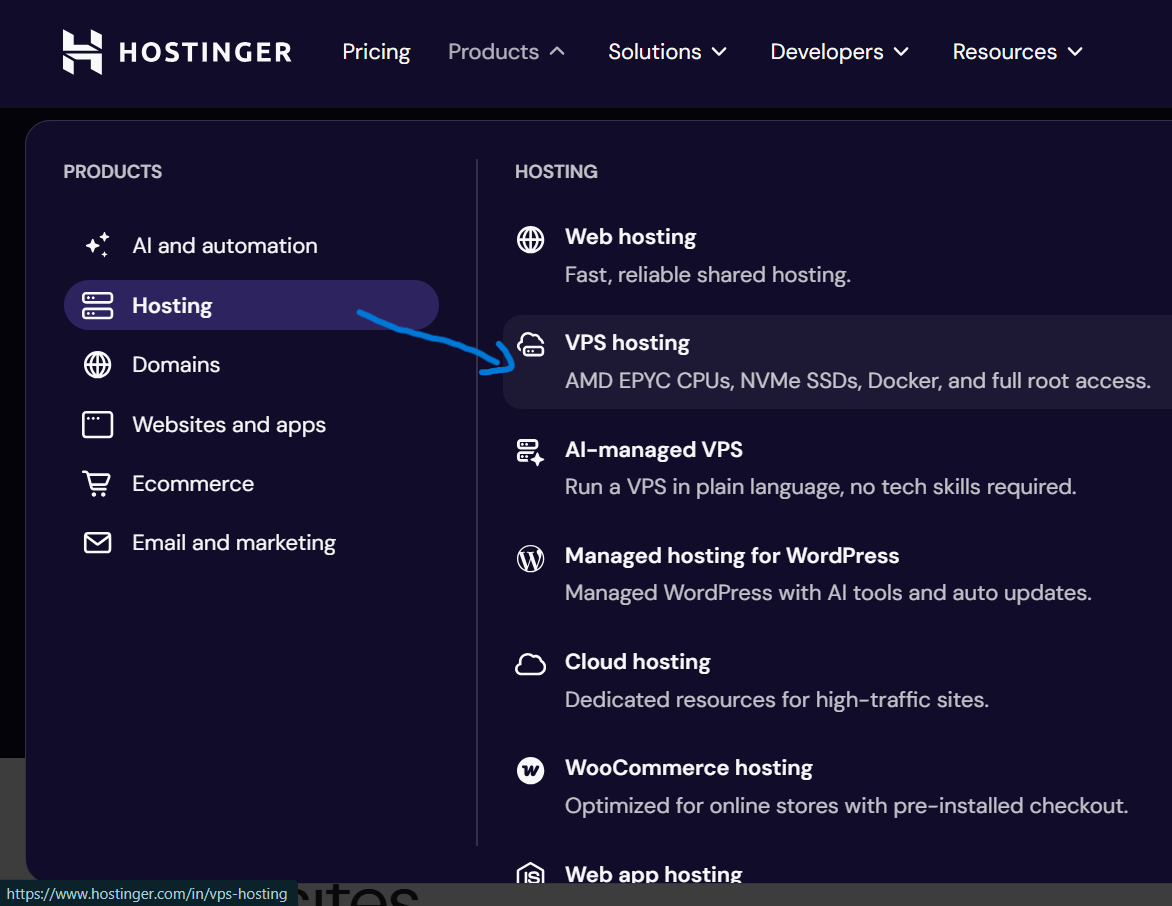
From the Products menu, go to the Hosting category and select VPS Hosting on the right side. This will take you to the VPS section, where you can access and manage your VPS hosting service. If you are still deciding which VPS plan to use, you can also check the available Hostinger VPS Hosting plans and choose one based on your project’s requirements.
Step 2: Open the VPS dashboard
After selecting the VPS, the VPS management dashboard will appear. From the dashboard, you can view basic server information and utilize various management options.
Hostinger VPS offers a flexible environment where you can build and host a wide range of websites and applications. Depending on your VPS setup and available resources, you can use it for Node.js, WordPress, PHP, HTML websites, and many other projects. Your VPS comes with a specific amount of storage, allowing you to use that space for your websites and files until you reach your allocated limit. Other features and resources depend on the VPS plan you have
Step 3: Check Your VPS Server Details
Once you open your VPS dashboard, take a moment to check your server details before moving on to the actual setup.
You can usually find important information such as your VPS IP address, server location, operating system, CPU, RAM, and storage.These details are useful because you may need them later when connecting to your server or installing software and applications.
It is also important to understand how much of your VPS resources are available for your projects. Your CPU, RAM, storage, and other resources determine how much work your server can handle. If you are planning to host multiple websites, WordPress projects, or applications such as Node.js and PHP, keeping an eye on these resources can help you manage your VPS more effectively. If you need more resources as your projects grow, you can review the available Hostinger VPS plans and choose a plan that better matches your requirements.
Step 4: Connect to Your Hostinger VPS
After checking your VPS details, the next step is to connect to your server. Unlike regular shared hosting, a VPS gives you more direct access to the server environment. This allows you to manage files, install software, configure applications, and make other changes according to your project’s requirements.
For many VPS users, the connection is made through SSH (Secure Shell). You can use an SSH client on your computer to connect to your VPS using the server’s IP address and login credentials. Once the connection is established, you can communicate with your server through the command line and start configuring it for your website or application.
If you are new to VPS hosting, don’t worry if SSH looks unfamiliar at first. You do not need to learn every command at once. Start with the basic commands and gradually become comfortable with managing your server. With a Hostinger VPS, you can use this server access to set up different types of projects, including WordPress, PHP, Node.js, and other applications.
Step 5: Secure and Prepare Your Hostinger VPS
Once you have opened your Hostinger VPS, you can start preparing it for your websites and other online projects. One of the main advantages of using a VPS is that you have a flexible server environment where you can create and host different types of websites and applications according to your needs.
You can use your VPS for WordPress, PHP, HTML, Node.js, and many other types of websites or projects. You are not limited to creating just one website.
You can create and host multiple websites as long as your available VPS resources are sufficient. Your storage is one of the important resources you can use for your websites, files, images, databases, and applications, so you can make use of the space included with your VPS according to your project requirements.
The amount of storage, RAM, CPU, and other resources available on your VPS depends on the plan you choose. As you create more websites and projects, these resources are shared between them. Therefore, you can make full use of your VPS, but you should keep an eye on your available resources to make sure your websites continue to run smoothly.
Step 6: Set Up Your Website on Hostinger VPS
After preparing your VPS, you can start setting it up for your website or other online projects. The setup depends on what you want to create, because a VPS gives you the flexibility to host different types of websites and applications. Whether you want to run a WordPress website, HTML website, PHP project, Node.js application, or another type of project, you can configure your VPS according to your requirements.
One of the useful things about a VPS is that you can use the same server for multiple projects instead of being limited to a single website. You can create and manage different websites as long as your VPS has enough storage, RAM, CPU, and other available resources to support them. If you are planning to start multiple websites or larger projects, you can check the available Hostinger VPS plans and choose a plan with resources that match your needs.
Once your website is set up, you can continue managing it from your VPS environment and use the available server resources for your projects. As your websites grow, regularly checking your VPS resources can help you understand when you may need additional capacity.
3. Hostinger VPS KVM Plans Explained
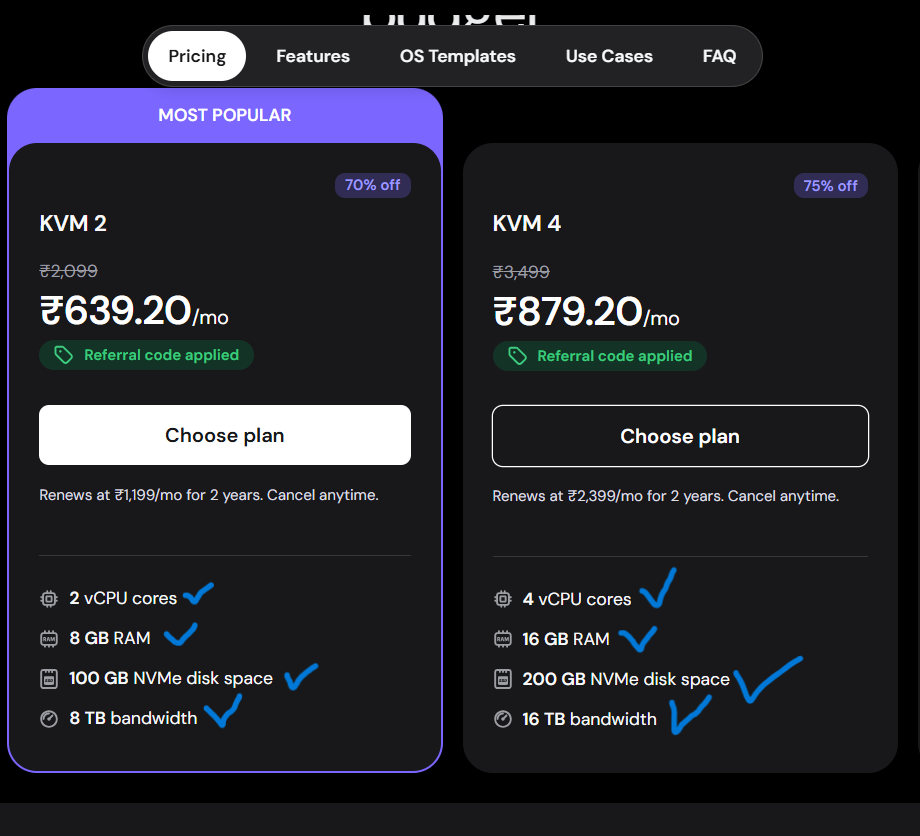
Choosing the right VPS plan becomes easier when you understand the resources included with each KVM configuration. Hostinger VPS plans come with different amounts of vCPU, RAM, NVMe disk space, and bandwidth, so you can choose a configuration based on the size and requirements of your websites or projects.
Whether you are starting with a small website or planning to host multiple websites and resource-intensive projects, understanding the difference between KVM 1, KVM 2, KVM 3, and KVM 4 can help you decide which level of resources you need. You can also check the available Hostinger VPS plans to compare the current options and pricing.
Step 1: KVM 1 – A Starting Option
KVM 1 comes with 1 vCPU core, 4 GB RAM, 50 GB NVMe disk space, and 4 TB bandwidth. It provides the basic resources you need to run websites and online projects on a VPS.
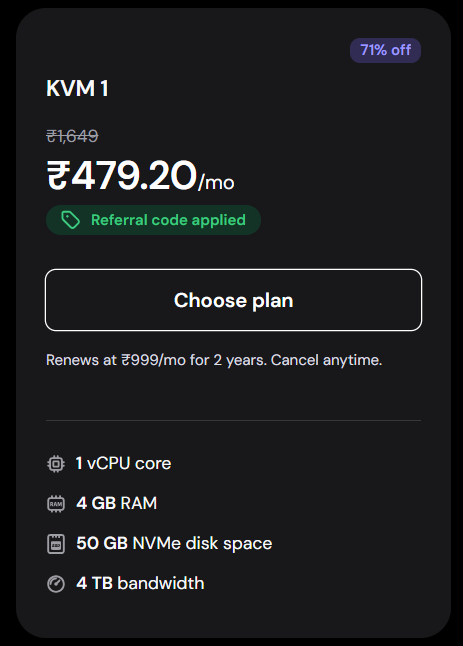
This option can be suitable when your projects do not require a large amount of CPU, memory, or storage. You can use the available resources for your websites, applications, files, and databases, depending on your requirements. If you are moving to VPS hosting for the first time, KVM 1 can also give you an opportunity to become familiar with managing a VPS environment.
Step 2: KVM 2 – Beginner-Friendly Option
KVM 2 provides 2 vCPU cores, 8 GB RAM, 100 GB NVMe disk space, and 8 TB bandwidth. With more CPU, RAM, storage, and bandwidth than KVM 1, it gives you additional room for websites and projects.
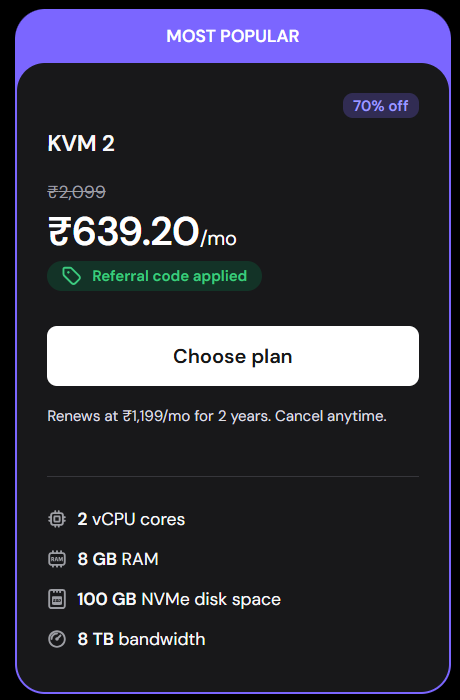
For beginners who want to host multiple websites or need more resources for their projects, KVM 2 can be a comfortable option. The 8 GB RAM and 100 GB NVMe storage provide more space to work with as your websites and projects grow.
Step 3: KVM 4 – For Advanced Projects
KVM 4 comes with 4 vCPU cores, 16 GB RAM, 200 GB NVMe disk space, and 16 TB bandwidth. The additional resources make this configuration more suitable for users who are managing larger websites, multiple projects, or applications that require more server capacity.
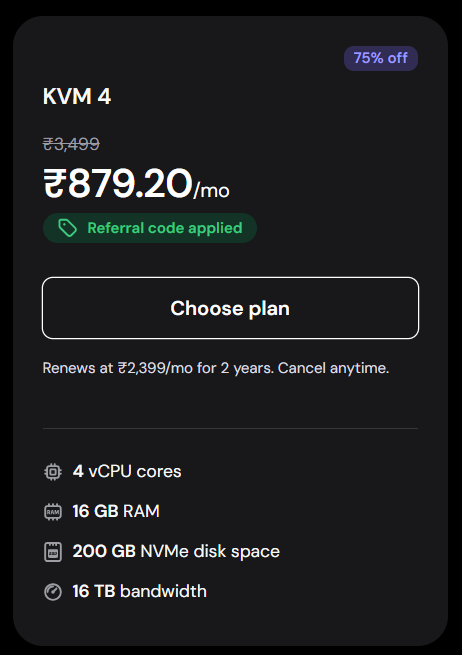
With 16 GB RAM and 200 GB of NVMe storage, you have considerably more room for websites, applications, databases, and other files. It can be a useful option for users who need more server resources as their projects become larger or more demanding.
Step 4: KVM 8 – For High-Resource Projects
KVM 8 provides 8 vCPU cores, 32 GB RAM, 400 GB NVMe disk space, and 32 TB bandwidth. Among these four configurations, it provides the highest amount of CPU, RAM, storage, and bandwidth.
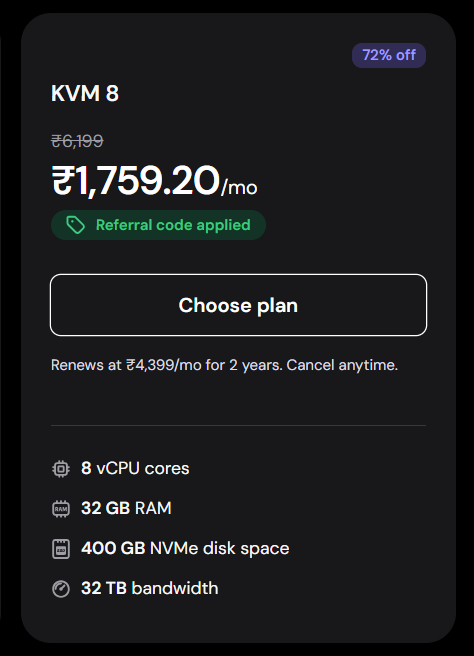
This level of resources can be useful for advanced users managing multiple websites, larger applications, or projects that require significantly more server capacity. With 400 GB of NVMe storage and 32 GB of RAM, you have considerably more room to manage multiple projects on one VPS, depending on how much resources each project uses.
When choosing a KVM configuration, you do not always need to select the plan with the highest specifications. The right choice depends on your websites, applications, expected workload, and the amount of CPU, RAM, storage, and bandwidth your projects actually require.
4. How to Manage Your Hostinger VPS
Once your Hostinger VPS is set up, the next important thing is learning how to manage it properly. A VPS gives you more control over your hosting environment, so you can use your available resources for websites, applications, files, databases, and other online projects.
Managing a VPS does not mean that you have to constantly change complicated server settings. For most users, it is mainly about keeping track of your available resources, managing your websites and files, and making sure everything continues to run smoothly. As you become more familiar with your VPS, you can also explore more of its management features.
1. Monitor Your VPS Resources
One of the most important parts of managing a VPS is keeping an eye on the resources available on your server. Depending on the KVM configuration you choose, your VPS comes with a specific amount of vCPU, RAM, NVMe disk space, and bandwidth. These resources are used by the websites, applications, files, and other projects running on your server.
If you are hosting multiple websites on the same VPS, all of those projects will use the resources available to your server. For example, you can host WordPress websites, HTML websites, PHP projects, Node.js applications, and other types of projects on your VPS. The number of websites you can run comfortably depends on how many resources each project uses.
Storage is also important when managing your VPS. Your available disk space can be used for website files, images, databases, applications, and other data. As you continue adding new projects, it is a good idea to check how much storage and other resources are being used.
If your websites or projects grow and you need additional server capacity, you can check the available Hostinger VPS plans and choose a configuration with resources that match your requirements.This option can be suitable when your projects do not require a large amount of CPU, memory, or storage. You can use the available resources for your websites, applications, files, and databases, depending on your requirements. If you are moving to VPS hosting for the first time, KVM 1 can also give you an opportunity to become familiar with managing a VPS environment.
2. Manage Your Websites and Applications
A major advantage of using a VPS is the freedom to host different types of websites and applications on the same server. You are not limited to creating only one website. You can use your VPS for multiple projects as long as your available server resources are sufficient.
For example, you can run a WordPress website for a blog, an HTML website for a business, a PHP-based project, or a Node.js application on the same VPS. Each project can have its own files and configuration while using the resources provided by your server.
As you add more websites, keeping your projects properly organized becomes important. Make sure you know which files and applications belong to each website and keep your server environment organized. This can make future updates, changes, and maintenance much easier.
3. Manage Your Storage and Files
Your VPS storage is another important part of server management. The NVMe disk space included with your plan can be used for your websites, images, videos, databases, applications, and other files.
If you are managing several websites, storage can gradually increase as you upload more content. Large images, videos, backups, databases, and application files can take up significant space, so checking your available storage from time to time is a good habit.
You can make full use of the storage included with your VPS for your projects, but it is important to remember that storage is only one part of your server resources. CPU and RAM are also shared by the projects running on your VPS. Keeping all of these resources in balance can help your websites and applications continue to work smoothly.
4. Keep Your VPS Updated and Organized
Keeping your VPS updated and organized is another important part of managing your server. Websites and applications may require updates over time, and the software running on your server can also need maintenance.
It is a good idea to keep track of the websites and applications you have installed and remove files or software that you no longer need. This can help you keep your server environment clean and make it easier to manage your projects as they grow.
You should also keep your login details secure and avoid sharing your VPS access with people who do not need it. If you are managing several websites or projects, maintaining a simple and organized server structure can save you time when you need to make changes later.
Managing Your VPS as Your Projects Grow
The way you manage your VPS can change as your projects become larger. A small website may use only a small portion of your available resources, while several websites or applications can require considerably more CPU, RAM, storage, and bandwidth.
The main idea is to use the resources included with your VPS according to your requirements and keep an eye on how your projects are using them. This gives you the flexibility to build and manage multiple websites and applications from one VPS while making the most of the resources avail
5. How to Set Up Your Hostinger VPS
Setting up a Hostinger VPS is the first important step before you start hosting a website, application, or other project on your server. Unlike regular shared hosting, a VPS gives you more control over the server environment, so you can choose the software and configuration according to your project requirements.
The good news is that Hostinger provides pre-configured templates that can simplify the initial setup. You can choose an operating system and, depending on your requirements, a software or control-panel template to get your VPS ready faster.
Step 1: Open Your Hostinger VPS
First, log in to your Hostinger account and open the VPS section from your dashboard.
Select the VPS you want to configure and open its management panel. From here, you can access important information such as your server resources, IP address, operating system, SSH access, and other VPS settings.
If you have just purchased a new VPS, Hostinger provides a setup process where you can choose the server location and operating system before starting to use the server.
Step 2: Choose an Operating System
After selecting your VPS plan, the next important step is to choose an operating system (Plain OS)*for your server. Hostinger gives you several operating-system options, including different Linux distributions, so you can choose the one that best matches your project requirements.
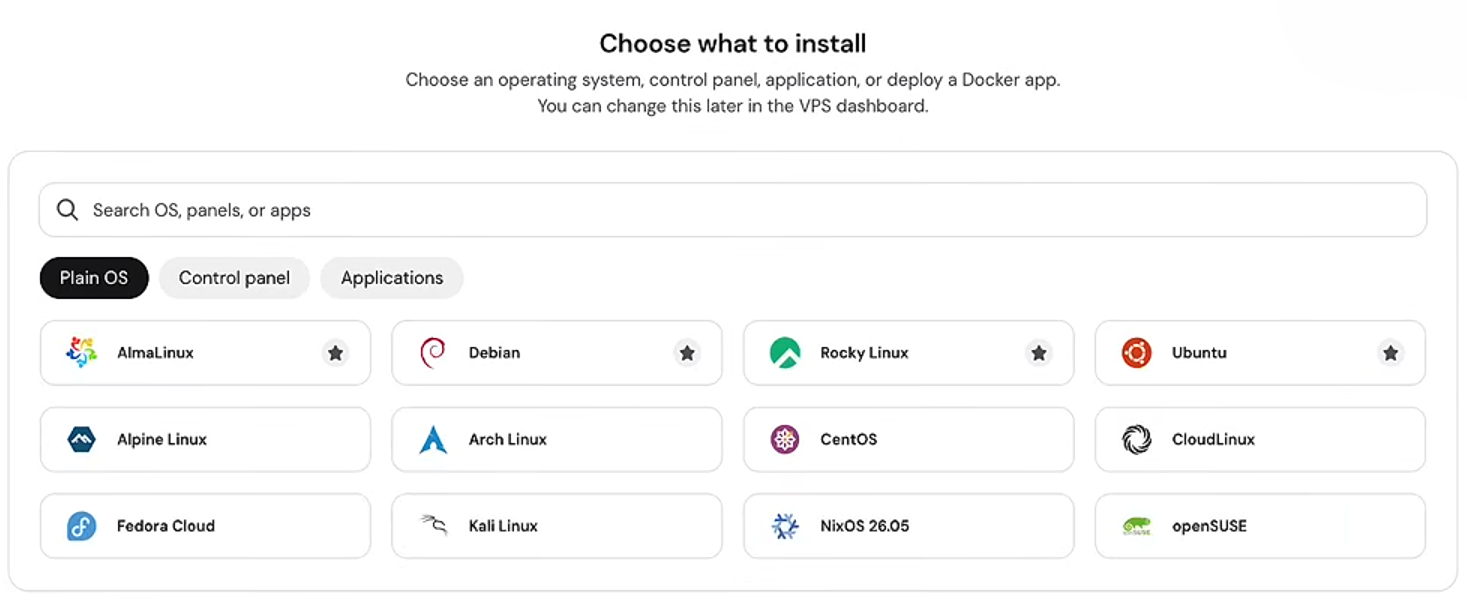
For this setup, we will select Ubuntu. Ubuntu is a popular choice for VPS hosting because it has a large software ecosystem, strong community support, and compatibility with a wide range of applications and development environments. Hostinger also describes Ubuntu as suitable for different VPS workloads and novice users.
After selecting Ubuntu, Hostinger will ask you to choose the available version. For this setup, select Ubuntu 24.04 LTS.
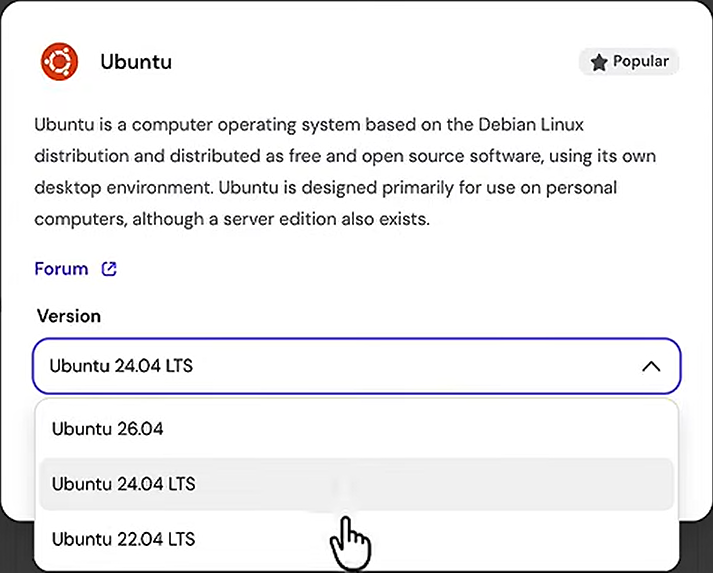
The LTS version is designed to provide long-term stability and security updates, making it a practical choice for a VPS that you plan to use for websites and applications over a longer period. Hostinger currently offers Ubuntu 24.04 as one of its VPS operating-system options.
For this setup, we will select Ubuntu. Ubuntu is a popular choice for VPS hosting because it has a large software ecosystem, strong community support, and compatibility with a wide range of applications and development environments. Hostinger also describes Ubuntu as suitable for different VPS workloads and novice users.
After selecting Ubuntu, Hostinger will ask you to choose the available version. For this setup, select Ubuntu 24.04 LTS. The LTS version is designed to provide long-term stability and security updates, making it a practical choice for a VPS that you plan to use for websites and applications over a longer period. Hostinger currently offers Ubuntu 24.04 as one of its VPS operating-system options.
So, the basic selection will be:
- Operating System: Ubuntu
- Version: Ubuntu 24.04 LTS
Once you have selected Ubuntu 24.04 LTS, you can continue with the remaining VPS setup steps. We will configure the server first and then move on to installing WordPress or other applications on the VPS.
Step 3: Set Up Secure Access to Your Hostinger VPS
After selecting the operating system, the next step is to set up secure access to your Hostinger VPS. During this step, you may be asked to create or set the credentials that will be used to access and manage your VPS.
Create a strong and unique password that is difficult for others to guess. Avoid using simple passwords such as your name, date of birth, phone number, or common words.
Your VPS password is extremely important because it can provide access to your server and its files. Never share your VPS password with anyone, and do not send it through public chats, emails, screenshots, or social media.
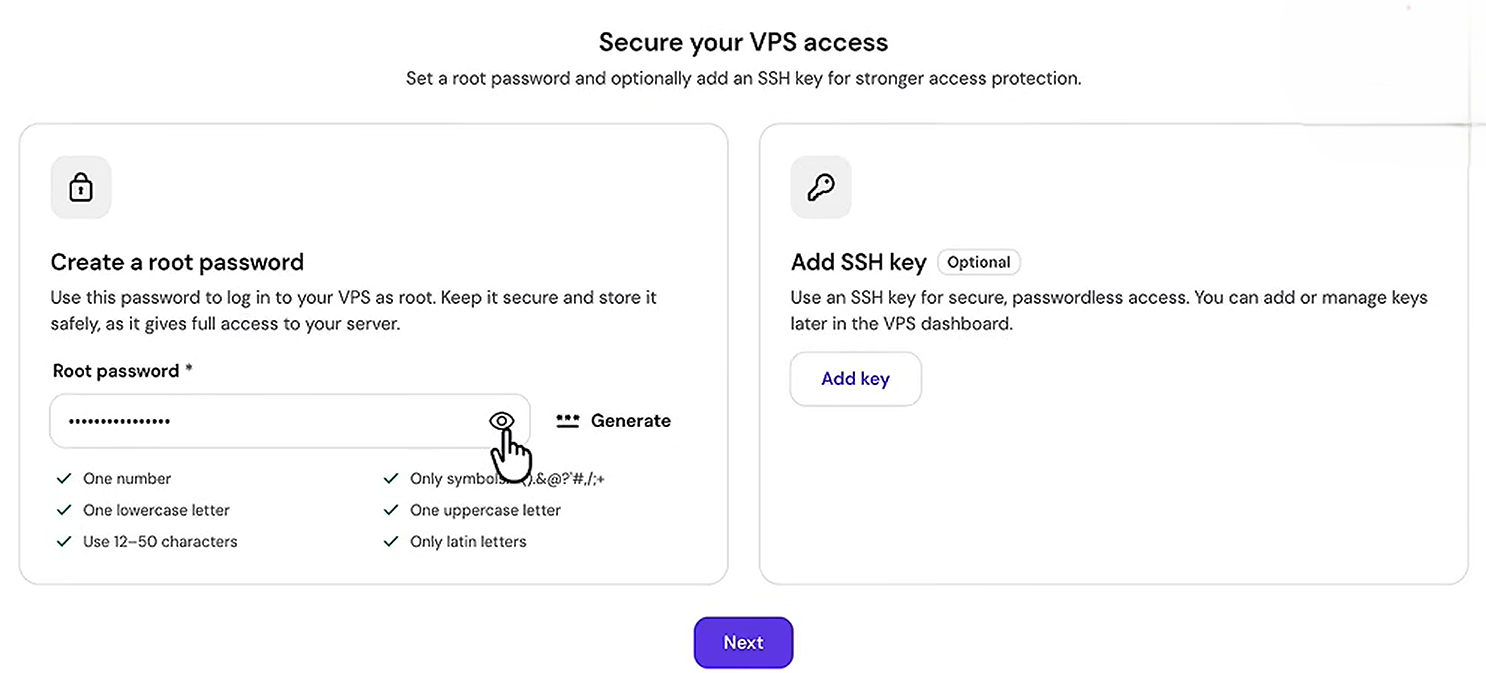
For better security, use a long password containing a combination of uppercase and lowercase letters, numbers, and special characters. Keep the password stored in a secure password manager so you do not have to save it in an unsafe location.
Once your VPS access credentials are securely configured, you can continue with the next step of setting up your server.
Step 4: Select Additional Features
After setting up your VPS access, Hostinger may present you with additional features that you can enable during the setup process. These might include options such as a Malware Scanner and Docker Manager.
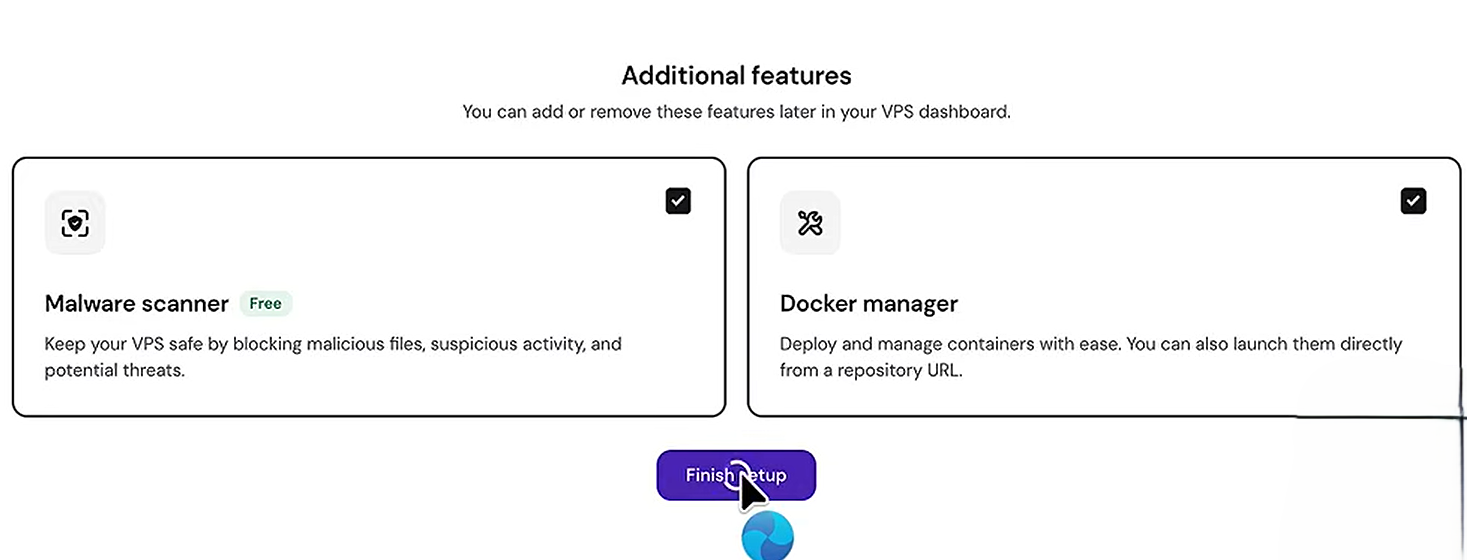
The Malware Scanner is useful for checking your website or server environment for potentially harmful files or malware. If your website ever encounters security issues, having a malware scanning tool can help you identify potential threats and take appropriate action. Therefore, enabling the malware scanning feature can be a valuable security measure for your VPS.
You may also see an option for Docker Manager. Docker is useful when you want to run applications in separate containers, making it easier to manage different applications and their respective environments on a single VPS.
If you plan to host a standard WordPress website, you might not need Docker for your current setup. However, if you work with applications that utilize Docker, it can be a highly beneficial feature.
Keep in mind that some additional features may incur extra charges. If you do not require Docker Manager or other paid features, you can skip them and add or use them later if needed.
Once you have selected the Malware Scanner and Docker Manager based on your needs, you can proceed with the setup. Hostinger will then begin setting up your VPS server with the chosen operating system and features. The setup process may take some time, so wait for the server to be fully configured before proceeding to the next step.
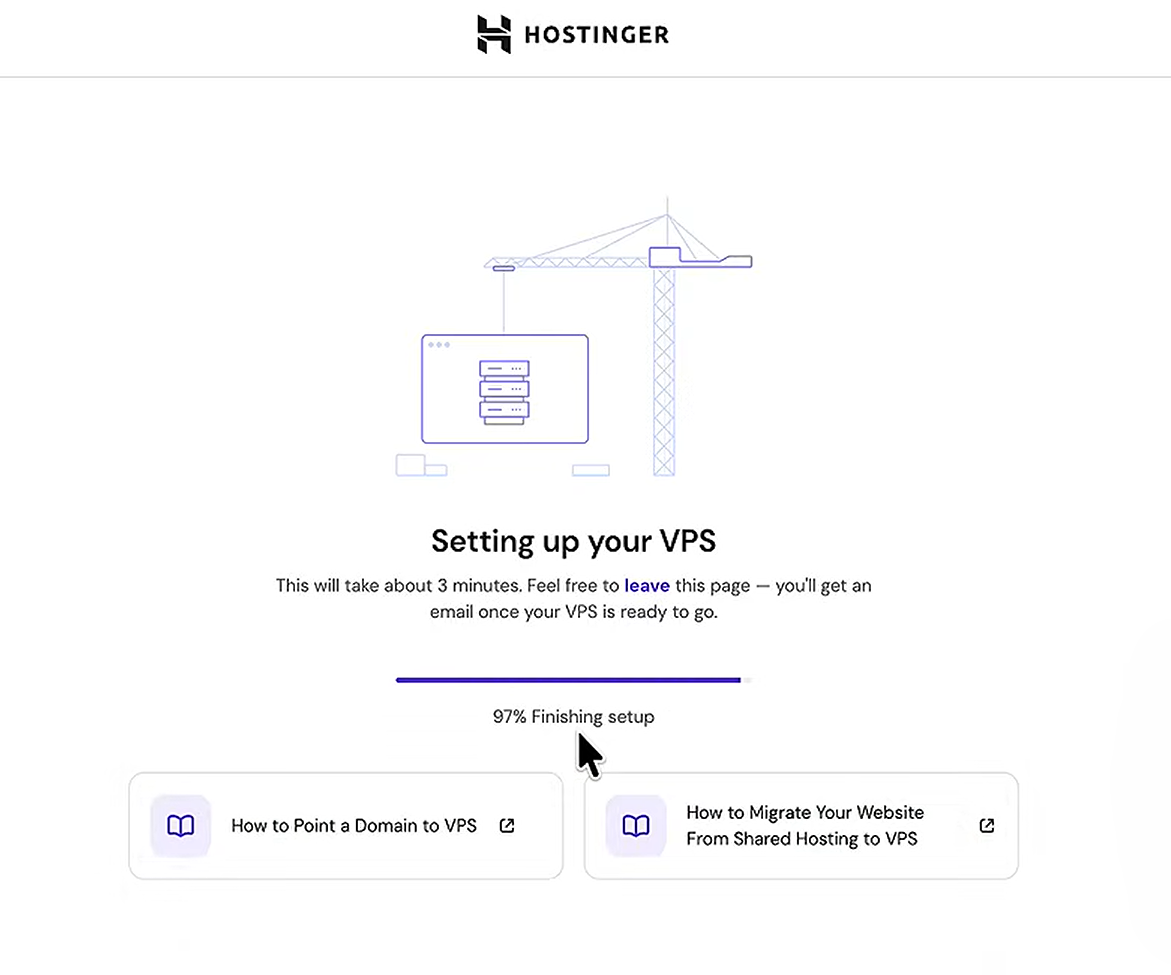
Step 5: Finish the VPS Setup
Once Hostinger finishes configuring your VPS, you will see a confirmation message such as “Well done! You are ready.” This means that the initial VPS setup has been completed and your server is ready to manage.
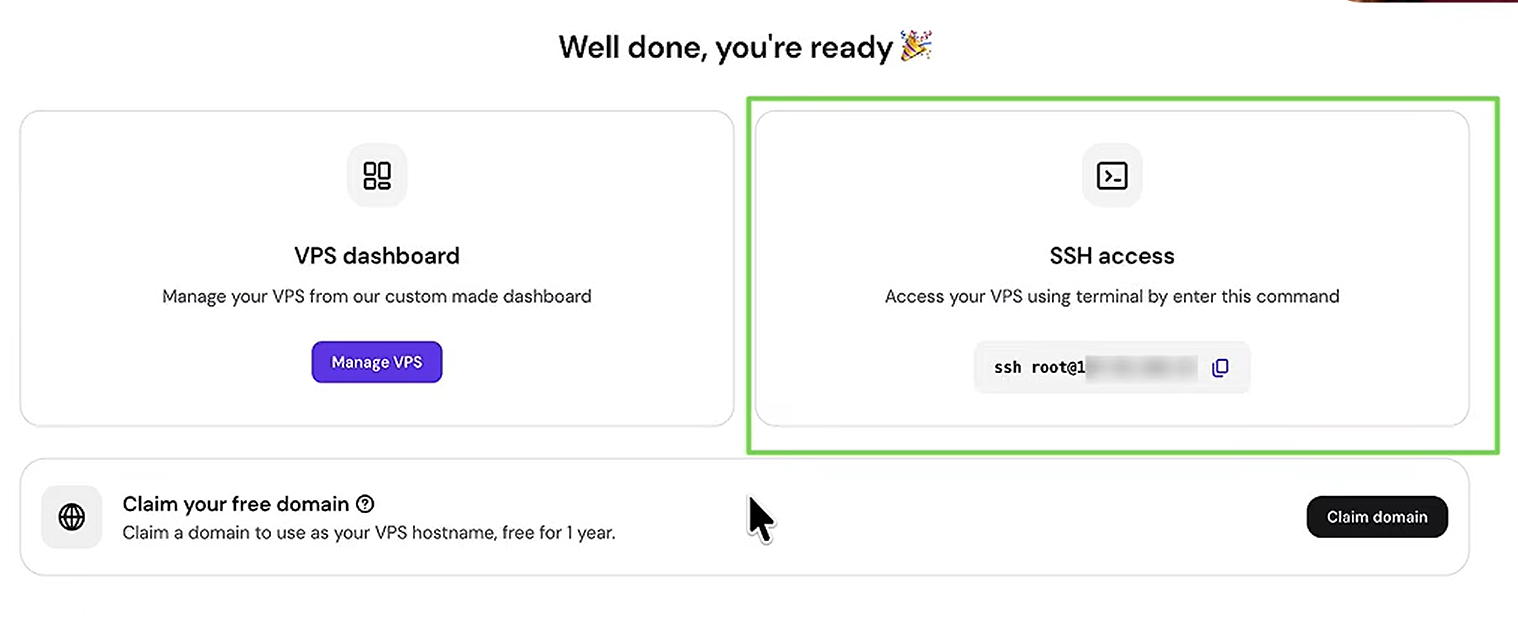
On the right side, you may see an SSH access section with your server connection details. You may also see information such as the root username and your VPS IP address. Your IP address identifies your VPS on the internet, so avoid sharing your server details publicly or with people you do not trust.
You may also see an option such as “Claim the Free Domain.” If your VPS plan is eligible for a free domain, you can claim one domain at no additional cost for the eligible period. If you do not want to claim it immediately, you can also check the offer and claim it later if the offer is still available.
If you want to use the free domain with your VPS, this is a good time to claim it and connect it to your server. You can also learn more about the process in our guide on How to Get a Free Domain for 1 Year with Hostinger. Always check the current plan terms and eligibility shown in your Hostinger account, as domain offers can vary by plan.
Once you have reviewed these details, click “Manage VPS” to open your VPS management area.
From the VPS management panel, you can monitor your server, manage its settings, access server tools, and continue with the next steps of your website setup.
6. How to Install WordPress on Hostinger VPS
Once your Hostinger VPS is fully set up, you can start installing WordPress on your server. Hostinger provides a pre-configured WordPress VPS template, which makes the installation process much easier because you do not have to manually configure every component required to run WordPress.
Before you begin, make sure your VPS is running Ubuntu and that you have access to your VPS management panel. If you are using a new VPS with no important data, you can proceed with the WordPress template without worrying about existing files.
Step 1: Open Your VPS Operating System Settings
First, log in to your Hostinger account and open the VPS section from the dashboard. Select the VPS where you want to build your website and click Manage to open the VPS management panel.
Whether you want to build a WordPress website, Node.js website, or another type of web application, having a proper control panel can make server and website management much easier. Hostinger provides CloudPanel as a free control panel option, giving you an easy-to-use interface where you can manage and add your websites on the VPS.
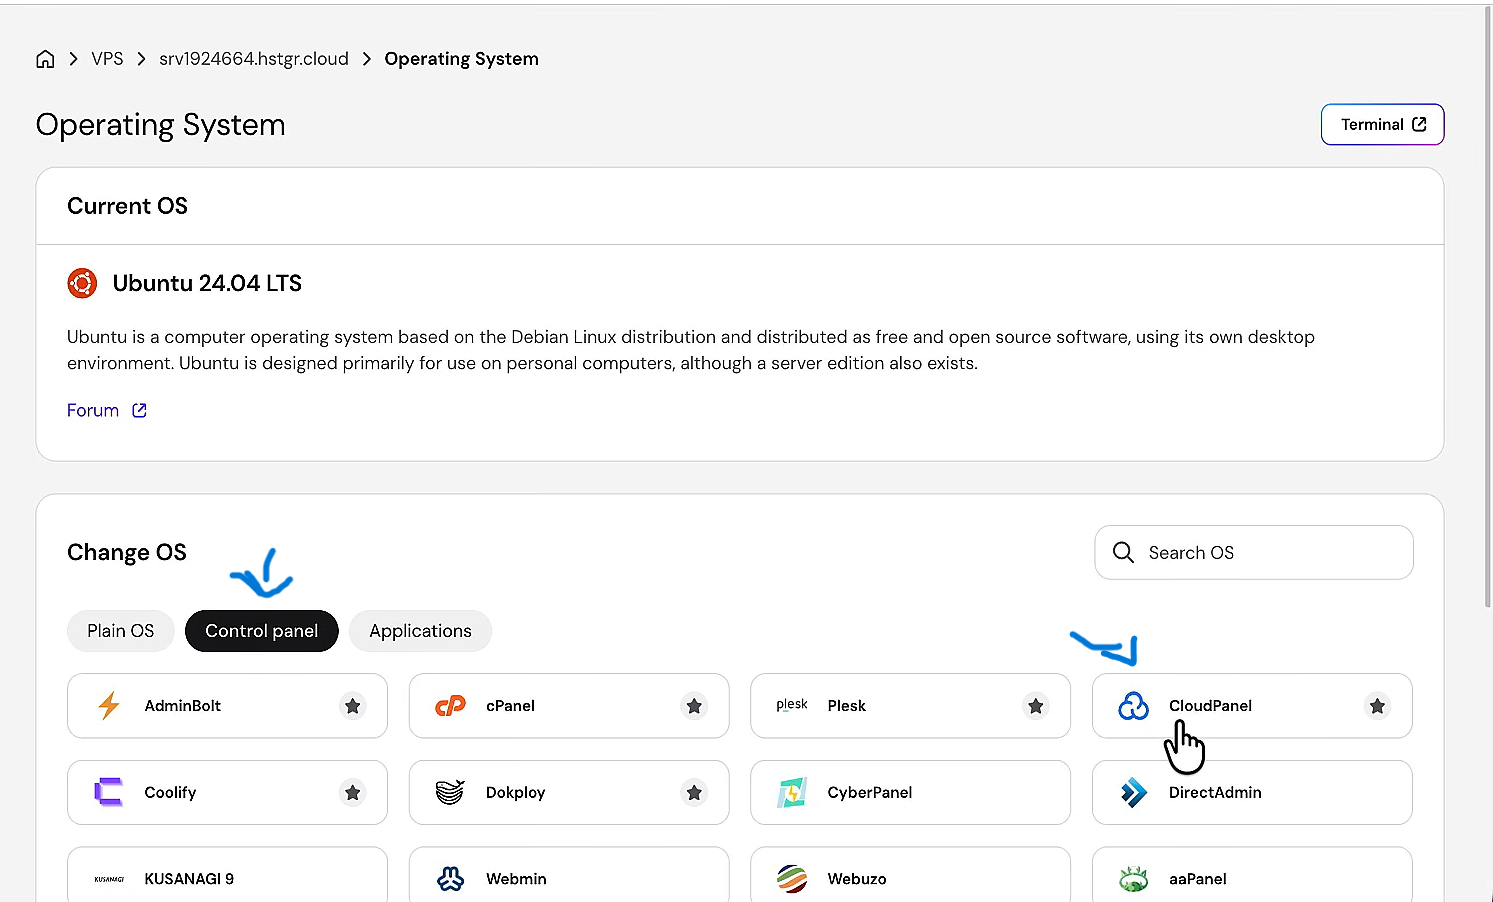
To set up CloudPanel, open OS & Panel from your VPS management area and then select Control Panel. Here, choose CloudPanel and click to install it. A popup will appear with the installation details. Click Next and continue through the confirmation screen. After confirming the installation, click Next again and create the required panel password when prompted.
Once the setup starts, Hostinger will begin installing CloudPanel on your VPS. The process can take some time, and after the installation is completed, your CloudPanel will be ready to access. You can then use the panel’s interface to manage your websites and continue setting up your WordPress website.
After CloudPanel is ready, you can move forward with the website setup and install WordPress on your VPS.
Step 2: Access CloudPanel and Add Your WordPress Website
Once CloudPanel has been installed, go back to your Hostinger hPanel. From the bottom menu, you will see the VPS option. Click on it to open your VPS section. If your VPS status shows that it is running, your server is active and ready to manage.
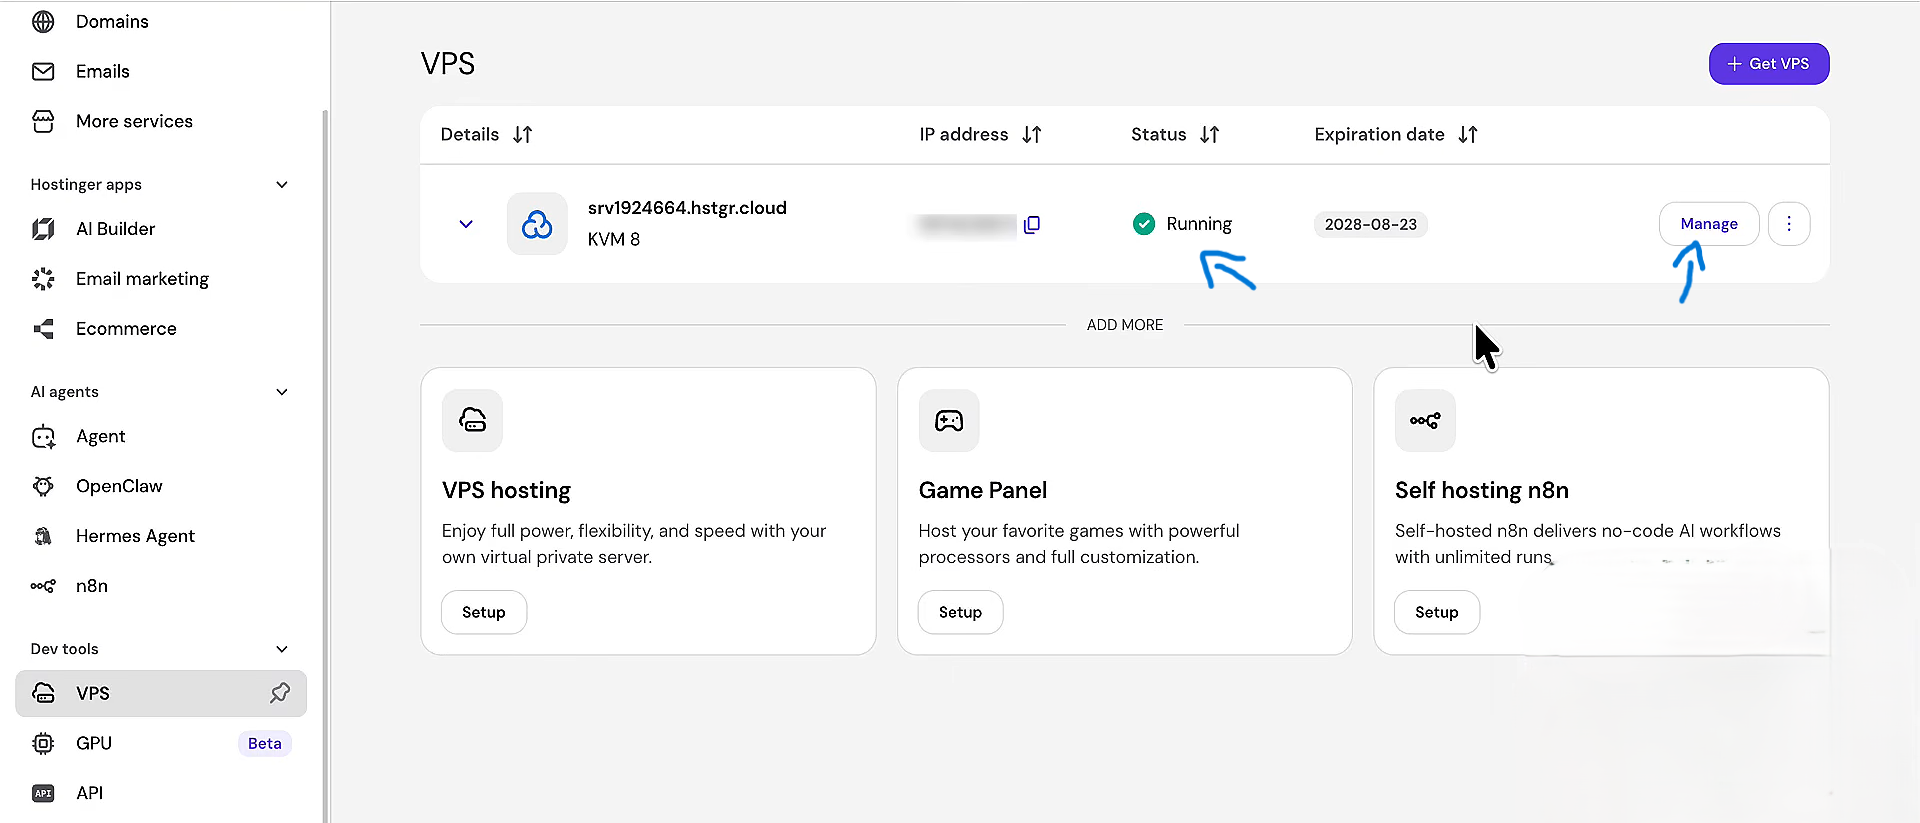
Next, click Manage and then open the Manage Panel. A new CloudPanel interface will open, where you may see a login form. If you see an error instead of the login form, do not worry. In some cases, the SSL certificate may still be installing. You may need to wait for around 2–4 hours until the SSL certificate is automatically installed. Once the SSL setup is complete, you should be able to access the CloudPanel login page.
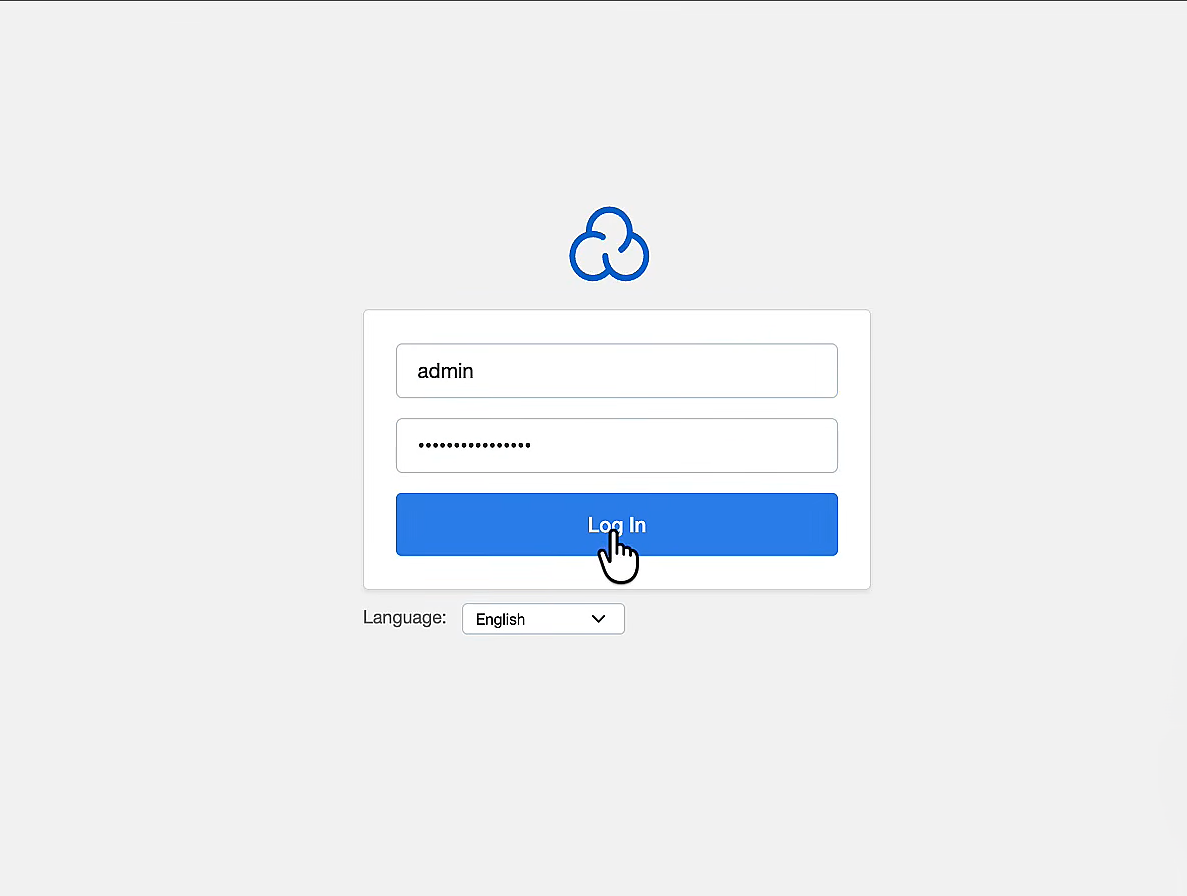
When the login form appears, enter the username admin and use the password that you created while setting up CloudPanel. Keep this password safe because you will need it whenever you want to access your CloudPanel.
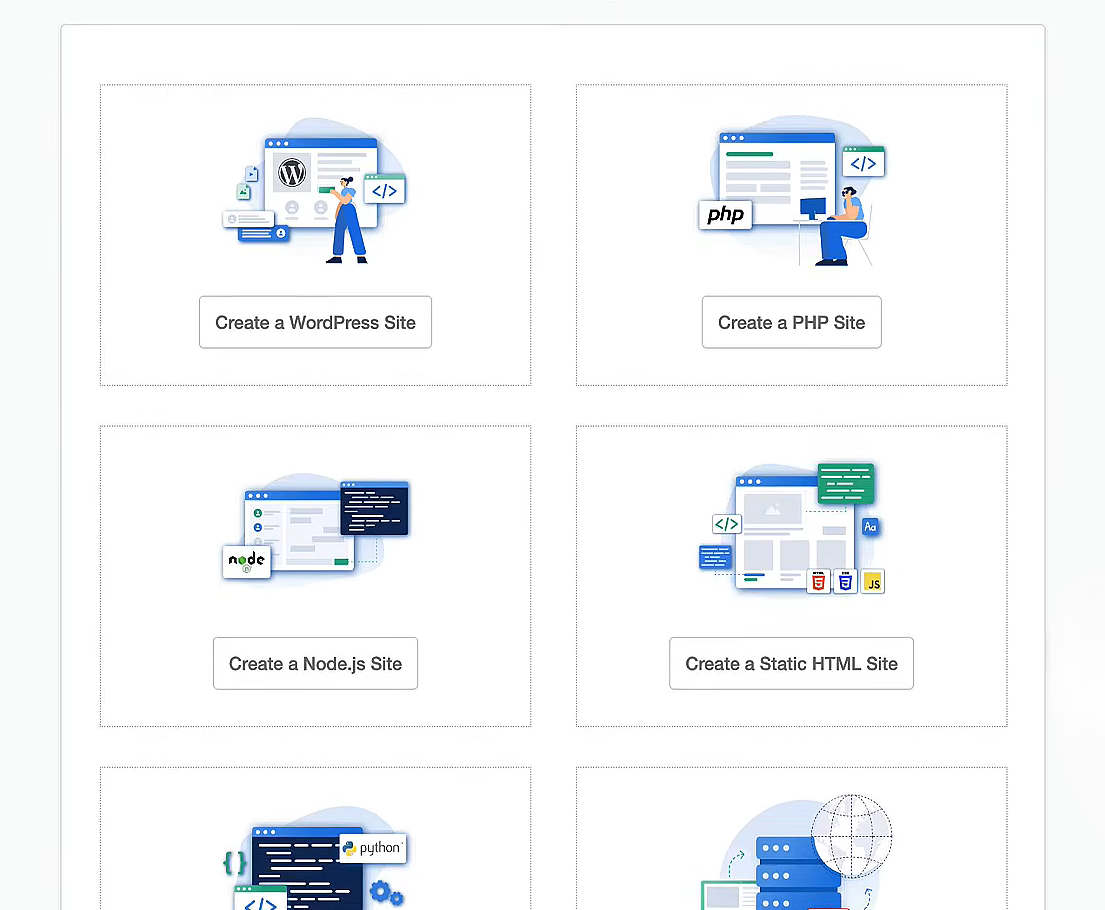
After logging in, you will see an Add Site option. Click on it to add your website to the VPS. CloudPanel provides several options for different types of websites and applications, including WordPress, PHP, Node.js, HTML, Python, and Proxy.
Since we are setting up a WordPress website in this guide, select WordPress. A setup form will then appear where you need to enter your website details, including your domain name and other required information.
Pay special attention to the WordPress administrator username and password. These credentials will be required when you log in to your WordPress dashboard, so make sure you remember them or store them securely.
Once you have entered all the required details, click Create. CloudPanel will then begin installing WordPress on your domain.
Before creating the website, make sure that the domain you purchased is already connected to your VPS server. Your domain needs to point to the VPS correctly so that the website can load through your domain after WordPress is installed.
After the WordPress installation is completed and your domain is correctly connected, you can access your website and log in to the WordPress dashboard using the administrator credentials you created during the setup.
Step 3: Select the WordPress Template
Inside the Operating System section, select **Applications** and look for the **WordPress** template.
Hostinger’s WordPress template is designed to prepare the VPS environment for WordPress automatically. This is particularly useful for beginners because you can avoid installing and configuring every required component manually.
Before applying the template, make sure you have selected the correct VPS. Installing or changing an operating-system template can remove existing data from the VPS, so always back up important files before continuing. If you are working with a new VPS, this usually is not a concern.
Step 4: Apply the WordPress Template
After selecting the WordPress template, click Change OS and follow the confirmation steps shown by Hostinger.
Hostinger will then start rebuilding the VPS with the selected WordPress environment. The installation may take a few minutes while the server prepares the required software.
Once the process is complete, your VPS will be ready for the next stage of the WordPress setup.
Step 5: Access Your WordPress Dashboard
After the WordPress template has been installed, you can access the WordPress login page through your VPS hostname.
Hostinger’s current documentation uses the following format:
`http://your-vps-hostname/wp-admin`
Replace `your-vps-hostname` with the actual hostname of your VPS. If your domain has already been connected to the VPS, you can also use your domain followed by `/wp-admin` to access the WordPress login page.
Once you reach the WordPress login screen, enter your administrator credentials and log in to your WordPress dashboard.
Step 6: Complete Your WordPress Setup
After logging in, you can complete the basic WordPress configuration. Set your website title, administrator details, permalink structure, theme, and other settings according to your website requirements.
At this point, WordPress is installed on your Hostinger VPS and you can start building your website.
Because the VPS gives you more control over the server environment, you can later install additional software, configure your server, or host other websites and applications depending on your available resources.