
Introduction :
If you’re planning to build a website, getting a free domain can save you money right from the beginning. The good news is that Hostinger offers a free domain for 1 year with eligible hosting plans, making it easier for beginners to launch their first website without paying separately for a domain name.
In this complete guide, you’ll learn How to Get a Free Domain for 1 Year with Hostinger step by step. Whether you’re starting a personal blog, business website, portfolio, or online store, this guide will show you how to get a free domain for 1 year with Hostinger without any confusion.
You’ll also discover which Hostinger plans include a free domain, who is eligible for the offer, how to claim your free domain during checkout, and what happens after the first year. By the end of this guide, How to Get a Free Domain for 1 Year with Hostinger will be simple, even if you’ve never purchased hosting before.
If you haven’t chosen a hosting plan yet, I recommend reading my detailed guide Best Cheap WordPress Hosting Deals – Starting From Rs.55/mo before continuing. It compares Hostinger plans, pricing, and features to help you choose the right option.
🚀 Ready to Get Your Free Domain?
Start your website today and claim your free domain for 1 year with an eligible Hostinger hosting plan.
1. What Is Hostinger's Free Domain Offer?
Before you learn How to Get a Free Domain for 1 Year with Hostinger, it’s important to understand how this offer works. Many beginners think a free domain is available with every hosting plan, but that’s not always the case.
Hostinger provides a free domain for 1 year with eligible hosting plans. This means you don’t have to purchase your domain separately during checkout if your selected plan qualifies for the offer. Instead, you can register a new domain name without paying the first-year registration fee, helping you save money when launching your website.
One of the biggest advantages of How to Get a Free Domain for 1 Year with Hostinger is that everything is managed in one place. Your hosting account and domain are connected automatically, making website setup much easier for beginners. You don’t have to worry about complicated technical settings or connecting different services manually.
If you’re planning to build a WordPress website, this offer becomes even more valuable. After claiming your free domain, you can quickly install WordPress and start building your website within minutes. If you’re new to WordPress, don’t miss my detailed guides How to Start a WordPress Blog with Hostinger and How to Install WordPress Step by Step, where I’ve explained the complete setup process for beginners.
It’s also worth remembering that How to Get a Free Domain for 1 Year with Hostinger applies only to the first year. After that, you’ll need to renew your domain at the standard renewal price if you want to keep using the same domain name.
2. Who Is Eligible for a Free Domain?
One of the most common questions beginners ask is whether everyone can claim Hostinger’s free domain offer. Before you follow How to Get a Free Domain for 1 Year with Hostinger, it’s important to know who is eligible for the promotion.
In most cases, you can get a free domain for 1 year when you purchase an eligible Hostinger hosting plan. The offer is usually available for new hosting purchases, especially longer-term plans such as annual, 24-month, or 48-month subscriptions. Very short-term plans may not include a free domain, so always check the plan details during checkout.
If you’re creating your first website, How to Get a Free Domain for 1 Year with Hostinger is a great option because it allows you to start without paying separately for a domain name. This can save you money while you focus on building your website.
You are generally eligible if:
- You are purchasing a new Hostinger hosting plan.
- The selected plan includes a free domain offer.
- You are registering a new domain name.
However, you may not be eligible if:
- You’re renewing an existing hosting plan.
- You’re transferring a domain from another registrar.
- The chosen hosting plan does not include the free domain promotion.
Understanding these requirements will help you avoid surprises during checkout and make How to Get a Free Domain for 1 Year with Hostinger much easier.
If you already own a domain from another company, don’t worry—you can still use it with Hostinger. And if you’re planning to build a blog, my How to Start a WordPress Blog with Hostinger guide will help you launch it step by step.
🚀 Check If You’re Eligible
Choose an eligible Hostinger hosting plan and see if you qualify for a free domain for 1 year.
3. Which Hostinger Plans Include a Free Domain?
If you’re following How to Get a Free Domain for 1 Year with Hostinger, choosing the right hosting plan is one of the most important steps. Not every Hostinger plan includes a free domain, so it’s worth checking the available options before placing your order.
Hostinger usually offers a free domain for 1 year with selected Premium and Business Web Hosting plans when you choose an eligible billing period. These plans are ideal for beginners because they include everything you need to launch a website, such as free SSL, managed WordPress, email accounts, fast LiteSpeed servers, and an easy-to-use control panel.
If your goal is to build a WordPress website or blog, How to Get a Free Domain for 1 Year with Hostinger becomes even more valuable when you choose the right plan. You’ll receive your hosting and domain together, making the setup process much easier and helping you save money on your first year.
Before completing your purchase, always review the plan details to confirm that the free domain for 1 year is included. Hostinger clearly displays this information during checkout, so you’ll know exactly what you’re getting before making the payment.
If you’re not sure which hosting plan is right for you, read my detailed guide Best Cheap WordPress Hosting Deals – Starting From Rs.55/mo, where I’ve compared Hostinger’s plans, pricing, and features. After purchasing your plan, you can continue with How to Start a WordPress Blog with Hostinger to build your website step by step.
🚀 Choose the Right Hostinger Plan
Select an eligible Hostinger hosting plan and claim your free domain for 1 year today.
4. Step-by-Step: How to Get a Free Domain for 1 Year with Hostinger
Now that you know which Hostinger plans include a free domain, it’s time to claim yours. In this section, you’ll learn How to Get a Free Domain for 1 Year with Hostinger step by step. Even if you’ve never purchased hosting before, the entire process is simple and beginner-friendly.
I’ll guide you through every step, from visiting the Hostinger website to claiming your free domain and completing your order. By following How to Get a Free Domain for 1 Year with Hostinger carefully, you’ll avoid common mistakes and have your domain ready within a few minutes.
Once you’ve successfully claimed your free domain, you can install WordPress and start building your website immediately. If you’re creating your first blog, don’t miss my complete guide How to Start a WordPress Blog with Hostinger. And if you already own a domain from another registrar, you can follow .
The following steps explain How to Get a Free Domain for 1 Year with Hostinger in detail, so simply follow them one by one.
🚀 Let’s Claim Your Free Domain
Get started with an eligible Hostinger hosting plan and claim your free domain in just a few minutes.
Step 1: Visit the Hostinger Website
The first step in How to Get a Free Domain for 1 Year with Hostinger is visiting the official Hostinger website. Open your preferred web browser and search for Hostinger.
If you’re reading this guide from India, visit Hostinger.in. If you’re from any other country, visit Hostinger.com to see the plans and pricing available in your region.
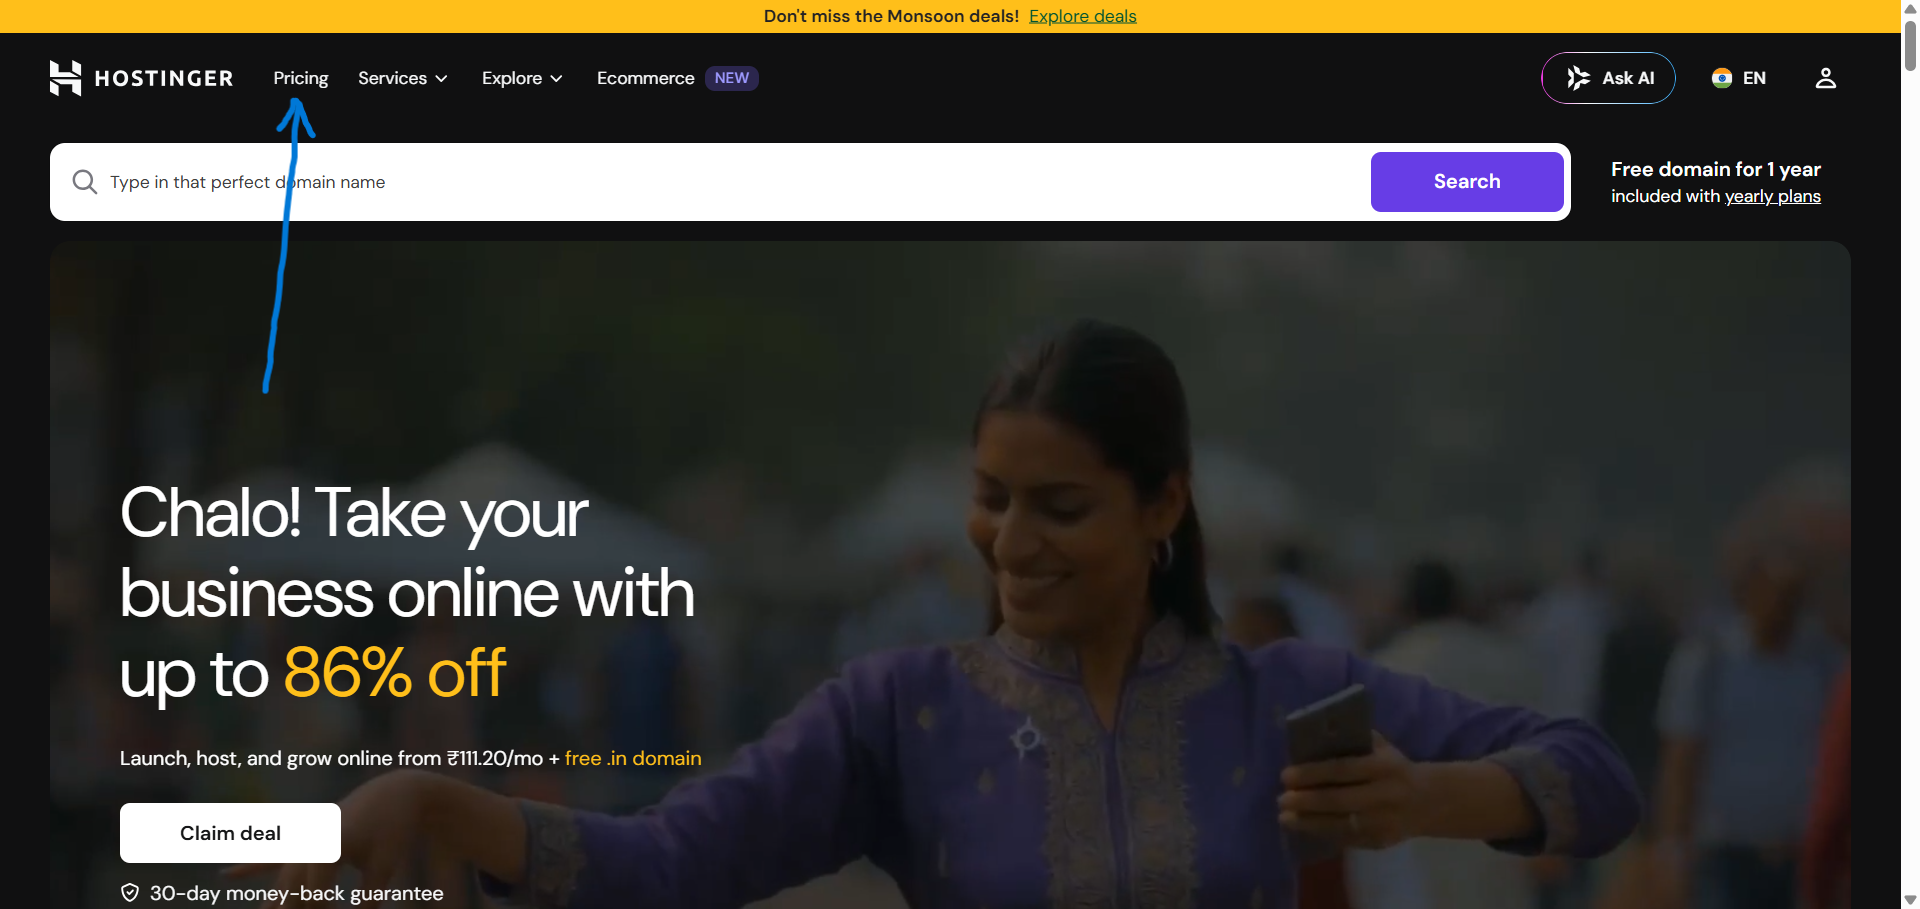
Once the website opens, take a few minutes to explore the available hosting plans. Since you’re following How to Get a Free Domain for 1 Year with Hostinger, make sure you choose a hosting plan that includes the free domain for 1 year offer. Hostinger usually highlights this offer directly on eligible plans, making it easy for beginners to identify.
Before moving to the next step, it’s also a good idea to compare the available plans so you can choose the one that best fits your website goals and budget. Selecting the right plan is an important part of How to Get a Free Domain for 1 Year with Hostinger, as the free domain offer is only available with eligible hosting plans.
If you’re unsure which hosting plan to choose, I recommend reading my detailed guide Best Cheap WordPress Hosting Deals – Starting From Rs.55/mo, where I’ve compared Hostinger’s plans, features, and pricing in detail. If your goal is to build a WordPress website after purchasing hosting, you can also read How to Start a WordPress Blog with Hostinger for a complete beginner-friendly setup guide.
🚀 Visit Hostinger & Get Started
Open the official Hostinger website and choose an eligible hosting plan to claim your free domain for 1 year.
Step 2: Choose an Eligible Hosting Plan
After opening the Hostinger website, the next step in How to Get a Free Domain for 1 Year with Hostinger is selecting an eligible hosting plan. This is one of the most important steps because the free domain for 1 year is only available with qualifying plans.
Take a few minutes to compare the available hosting plans and their features. For most beginners, the Premium Web Hosting plan is an excellent choice because it offers everything you need to build a website, including a free domain for 1 year, free SSL certificate, managed WordPress, professional email, fast LiteSpeed servers, and 24/7 customer support.
Take a few minutes to compare the available hosting plans and their features. For most beginners, the Premium Web Hosting plan is an excellent choice because it offers everything you need to build a website, including a free domain for 1 year, free SSL certificate, managed WordPress, professional email, fast LiteSpeed servers, and 24/7 customer support.
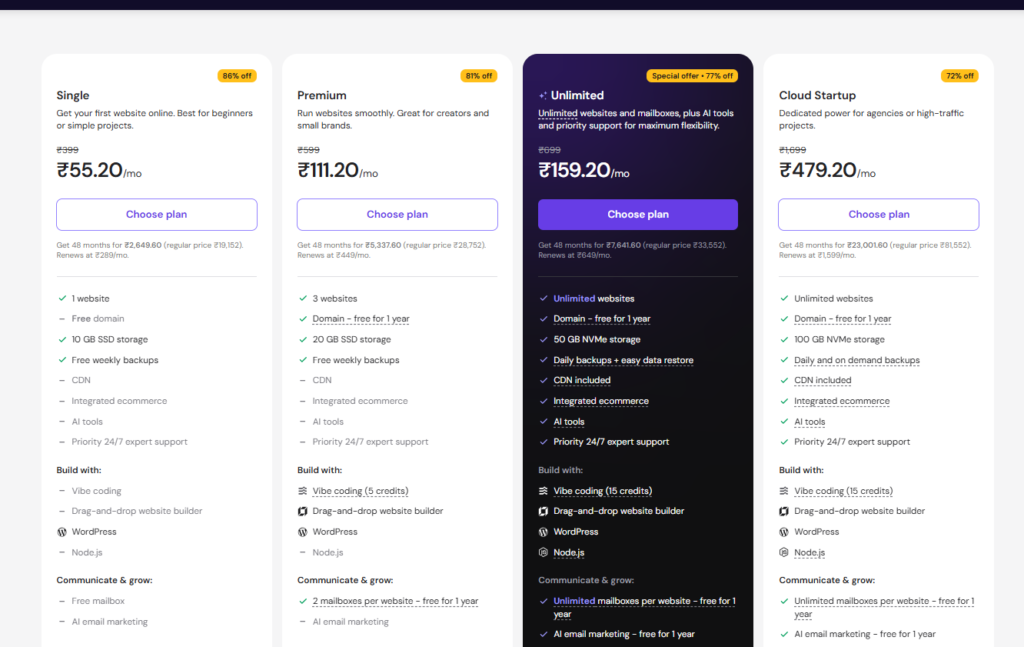
If you’re planning to create a personal blog, business website, portfolio, or affiliate website, choosing the right hosting plan will make How to Get a Free Domain for 1 Year with Hostinger much easier. As your website grows, you can always upgrade your hosting plan without moving your website to another provider.
Before clicking Choose Plan or Get Started, double-check that the hosting plan clearly displays the free domain for 1 year offer. Confirming this before checkout is an important part of How to Get a Free Domain for 1 Year with Hostinger and helps you avoid missing the promotion.
🚀 Select Your Hosting Plan
Choose an eligible Hostinger hosting plan and unlock your free domain for 1 year today.
Step 3: Click Get Started
Once you’ve selected an eligible hosting plan, the next step in How to Get a Free Domain for 1 Year with Hostinger is clicking the Get Started or Choose Plan button. This will take you to the next stage, where you can select your billing period and continue with your order.
Before moving forward, take a moment to review the features included in your selected plan. Make sure it clearly mentions the free domain for 1 year offer, along with other important features such as a free SSL certificate, WordPress support, email accounts, and daily or weekly backups (depending on the plan).
Confirming these details is an important part of How to Get a Free Domain for 1 Year with Hostinger because it ensures you’re choosing the right hosting package.
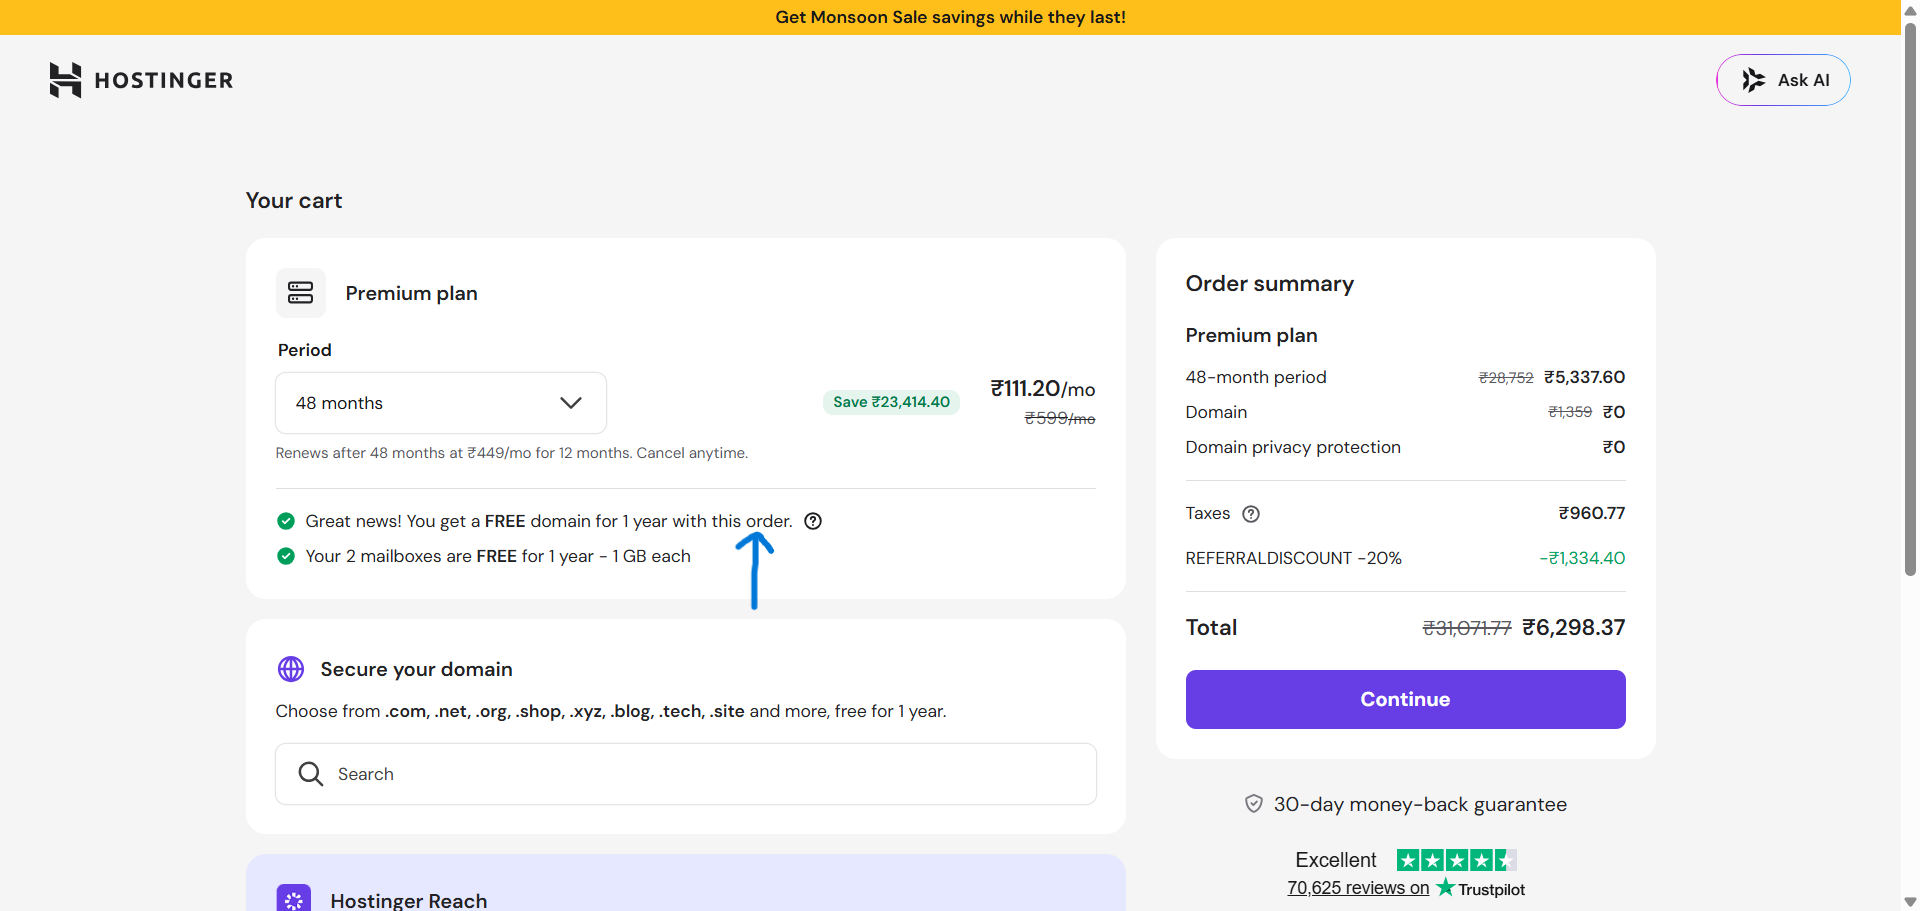
After clicking Get Started, Hostinger will guide you through the checkout process. Don’t worry if this is your first time purchasing hosting—the process is simple and beginner-friendly. You’re now one step closer to completing How to Get a Free Domain for 1 Year with Hostinger and launching your website.
If you haven’t decided which plan offers the best value, check out my detailed guide Best Cheap WordPress Hosting Deals – Starting From Rs.55/mo. After completing your purchase, you can follow How to Install WordPress Step by Step to get your website online in just a few minutes.
🚀 Continue to Checkout
Click Get Started and move to the next step to claim your free domain for 1 year with Hostinger.
Step 4: Select Your Billing Period
After clicking Get Started, the next step in How to Get a Free Domain for 1 Year with Hostinger is selecting your billing period. Hostinger usually offers several subscription options, such as 1 month, 12 months, 24 months, and 48 months. Each option comes with different pricing and benefits.
If your goal is to get a free domain for 1 year, make sure you choose an eligible hosting plan and billing period. In most cases, longer-term plans provide better discounts and include the free domain for 1 year offer. Before continuing, carefully check the plan details to confirm that the free domain is included with your selected subscription.
Choosing the right billing period is an important part of How to Get a Free Domain for 1 Year with Hostinger because it helps you save more money in the long run. Although longer plans require a higher upfront payment, they usually offer the lowest monthly price and additional benefits compared to shorter subscriptions.
🚀 Choose the Best Plan Duration
Select an eligible billing period and continue to claim your free domain for 1 year with Hostinger.
Step 5: Search for Your Domain Name
Now comes one of the most exciting parts of How to Get a Free Domain for 1 Year with Hostinger—choosing your domain name. After selecting your hosting plan and billing period, Hostinger will ask you to search for the domain name you want to register.
Enter your preferred domain name into the search box and click Search or press Enter. Hostinger will instantly check whether your domain name is available. If it’s available, you’ll see the option to claim it as your free domain for 1 year. If your first choice has already been taken, don’t worry. Try a different name or use another extension until you find one that suits your website.
Enter your preferred domain name into the search box and click Search or press Enter. Hostinger will instantly check whether your domain name is available. If it’s available, you’ll see the option to claim it as your free domain for 1 year. If your first choice has already been taken, don’t worry. Try a different name or use another extension until you find one that suits your website.
When choosing a domain name, keep it short, easy to remember, and relevant to your niche or brand. Avoid using numbers, special characters, or difficult spellings, as they can make your website harder to remember.
Picking the right domain is an important part of How to Get a Free Domain for 1 Year with Hostinger because your domain represents your brand and helps visitors recognize your website.
If you’re planning to start a blog after registering your domain, I recommend reading How to Start a WordPress Blog with Hostinger.
🚀 Find Your Perfect Domain
Search for your favorite domain name and claim your free domain for 1 year before someone else registers it.
Step 6: Claim Your Free Domain
If your preferred domain name is available, the next step in How to Get a Free Domain for 1 Year with Hostinger is claiming it. Hostinger will automatically display your selected domain during the checkout process, along with the free domain for 1 year offer if your hosting plan is eligible.
Before you continue, carefully review your selected domain name. Make sure there are no spelling mistakes because your domain name represents your website and changing it later can be difficult. Also, verify that the domain extension (such as .com, .in, .net, or another available option) is the one you want to use.
At this stage, you should also check your order summary. If everything is correct, you should see that the registration cost for your free domain for 1 year has been reduced to ₹0 (or your local currency equivalent) for the first year.
Confirming this is an important part of How to Get a Free Domain for 1 Year with Hostinger, as it ensures you’re receiving the promotional offer before making the payment.
If you haven’t decided which Hostinger plan gives the best value, read my guide Best Cheap WordPress Hosting Deals – Starting From Rs.55/mo. After claiming your free domain, you can continue with How to Install WordPress Step by Step to launch your website quickly and easily.
🚀 Secure Your Free Domain
Review your order, confirm your free domain for 1 year, and move to the next step with confidence.
Step 7: Create Your Hostinger Account
After claiming your domain, the next step in How to Get a Free Domain for 1 Year with Hostinger is creating your Hostinger account. If you already have an account, simply sign in. If you’re a new user, you’ll need to create one before completing your purchase.
Enter your email address and create a strong password, or choose one of the available sign-up options, such as signing in with your Google account. Once your account is created, Hostinger will save your hosting plan, domain, and billing details in one place, making it easy to manage everything from a single dashboard.
Creating your account is an important part of How to Get a Free Domain for 1 Year with Hostinger because it links your hosting plan and free domain for 1 year to your personal account. Before continuing, double-check that your email address is correct, as Hostinger will use it to send important information, including your login details, payment confirmation, and account notifications.
If you’re planning to build a WordPress website after completing your purchase, don’t miss my beginner-friendly guide How to Start a WordPress Blog with Hostinger. You can also read How to Install WordPress Step by Step to set up your website quickly after your account is ready.
🚀 Create Your Hostinger Account
Create your Hostinger account and continue with How to Get a Free Domain for 1 Year with Hostinger in just a few simple steps.
Step 8: Complete the Payment
Now you’re just one step away from claiming your free domain. The next step in How to Get a Free Domain for 1 Year with Hostinger is completing your payment securely. Once your Hostinger account is ready, review your order summary one last time before proceeding.
Carefully check that your selected hosting plan, billing period, and domain name are correct. Most importantly, confirm that the free domain for 1 year has been applied to your order. If you’re eligible for the offer, the domain registration cost should appear as FREE or ₹0 (or your local currency equivalent) for the first year.
Hostinger supports multiple secure payment methods, including credit cards, debit cards, UPI, PayPal, net banking, and other options depending on your country. Choose the payment method that works best for you and complete the transaction. This is an important step in How to Get a Free Domain for 1 Year with Hostinger, so take a moment to verify all your order details before clicking the payment button.
Once your payment is successful, Hostinger will send a confirmation email and your hosting account will be activated automatically. If your goal is to build a WordPress website next, read my detailed guides How to Start a WordPress Blog with Hostinger and How to Install WordPress Step by Step to continue your website setup.
🚀 Complete Your Order Securely
Finish your payment today and activate your hosting with a free domain for 1 year.
Step 9: Verify Your Free Domain
Congratulations! After completing your payment, the final step in How to Get a Free Domain for 1 Year with Hostinger is verifying that your free domain has been successfully added to your Hostinger account.
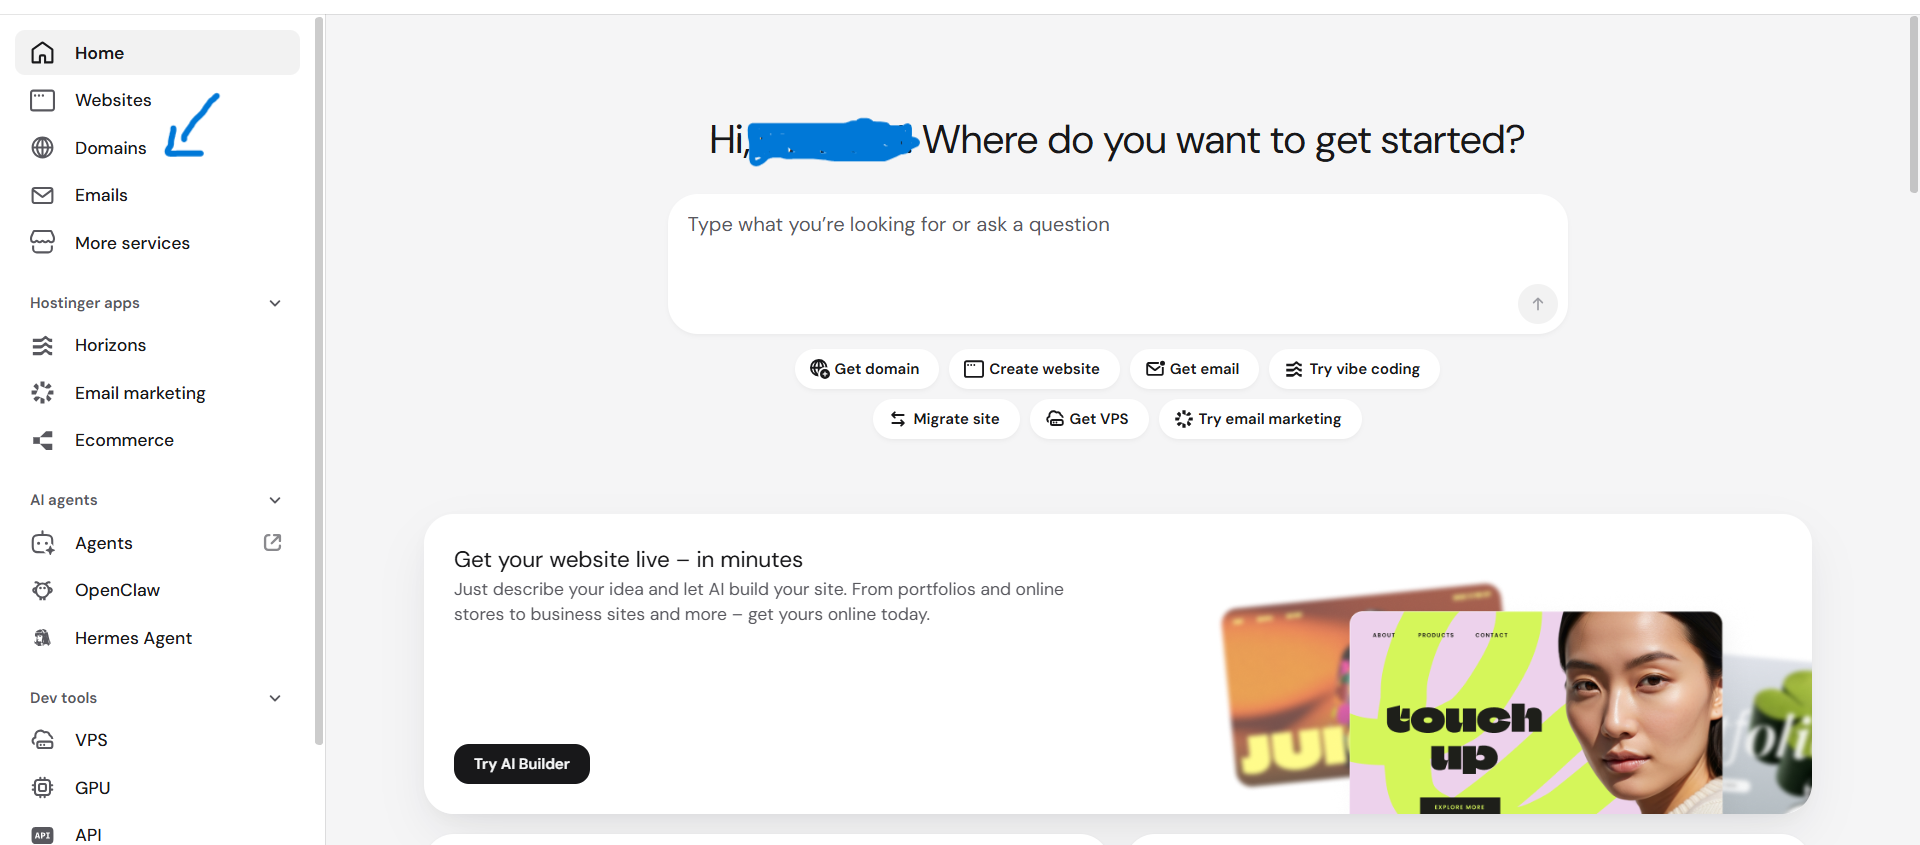
Log in to your Hostinger Dashboard and open the Domains section. Here, you should see the domain name you registered during checkout. If your hosting plan was eligible, your free domain for 1 year will already be connected to your account, and you’ll be able to manage it directly from the Hostinger dashboard.
You can also check your registered email inbox for the confirmation email sent by Hostinger. This email usually includes your hosting details, domain information, payment confirmation, and other important account information. Verifying these details is an important part of How to Get a Free Domain for 1 Year with Hostinger because it confirms that everything has been set up correctly.
🚀 Your Free Domain Is Ready!
Verify your domain, access your Hostinger dashboard, and start building your website today.
5. What Happens After the First Year?
After successfully completing How to Get a Free Domain for 1 Year with Hostinger, many beginners have one common question: What happens when the first year ends? Understanding this before purchasing your hosting plan will help you avoid any surprises later.
The free domain for 1 year is a promotional offer available with eligible Hostinger hosting plans. Once the first year is over, you’ll need to renew your domain to keep ownership of it. Domain renewals are not free, and the renewal price depends on the domain extension (such as .com, .in, or .net) and the current pricing at the time of renewal.
Before your domain expires, Hostinger usually sends reminder emails to the email address linked to your account. These notifications give you enough time to renew your domain and keep your website online without interruption.
Renewing your domain on time is an important part of How to Get a Free Domain for 1 Year with Hostinger, because if you don’t renew it before the expiration date, your website and email services connected to that domain may stop working.
To make things easier, you can also enable Auto-Renew from your Hostinger account. With Auto-Renew turned on, Hostinger will automatically renew your domain before it expires using your saved payment method. If you prefer to renew it manually, simply keep an eye on the renewal reminders and complete the payment before the due date.
🚀 Keep Your Domain Active
Claim your free domain for 1 year today and renew it on time to keep your website running without interruption.
6. Tips for Choosing the Perfect Domain Name
Choosing the right domain name is one of the most important parts of How to Get a Free Domain for 1 Year with Hostinger. Your domain is your website’s identity, so it’s worth spending a little extra time selecting a name that is simple, memorable, and relevant to your niche.
When you’re following How to Get a Free Domain for 1 Year with Hostinger, try to choose a domain name that is short and easy to spell. A simple domain is easier for visitors to remember, type, and share with others. Avoid using numbers, hyphens, or unusual spellings because they can confuse users and make your website look less professional.
It’s also a good idea to choose a domain name that reflects your brand, business, or blog topic. For example, if your website is about WordPress tutorials, blogging, or web hosting, your domain should give visitors an idea of what your content is about. This not only helps with branding but also makes How to Get a Free Domain for 1 Year with Hostinger more effective when you’re building a long-term online presence.
Before registering your domain, check it carefully for spelling mistakes because changing a domain name later is not easy. If your preferred .com domain isn’t available, you can also consider other trusted extensions like .in, .net, or .org, depending on your audience and website goals.
If you’re planning to launch a new WordPress website after registering your domain, don’t miss my guides How to Start a WordPress Blog with Hostinger and How to Install WordPress Step by Step.
🚀 Register the Perfect Domain
Choose a memorable domain name and start building your website with Hostinger today.
7. Common Mistakes to Avoid
Even after following How to Get a Free Domain for 1 Year with Hostinger, many beginners make a few common mistakes that can lead to unnecessary problems later. The good news is that these mistakes are easy to avoid if you know what to look for before completing your purchase.
One of the biggest mistakes is choosing a hosting plan that doesn’t include the free domain for 1 year. Before making the payment, always review the plan details carefully and confirm that the free domain offer is included. This simple step can save you from paying separately for your domain.
Another common mistake while following How to Get a Free Domain for 1 Year with Hostinger is rushing through the domain registration process. Always double-check your domain name for spelling mistakes before confirming it. Once a domain is registered, changing it later can be difficult and may require purchasing a new domain.
Many beginners also forget to renew their domain after the first year. Although you receive a free domain for 1 year, you’ll need to renew it before it expires to keep your website online. Enabling Auto-Renew or setting a reminder can help you avoid losing your domain.
By avoiding these simple mistakes, How to Get a Free Domain for 1 Year with Hostinger becomes a smooth and hassle-free experience, even if you’re creating your very first website.
🚀 Start the Right Way
Avoid common mistakes and claim your free domain for 1 year with confidence.
8. Frequently Asked Questions (FAQ)
Before completing How to Get a Free Domain for 1 Year with Hostinger, many beginners have a few common questions. Below are the answers to the most frequently asked questions to help you understand the process better and avoid confusion.
1. Is the domain really free with Hostinger?
Yes. Hostinger offers a free domain for 1 year with eligible hosting plans. However, the offer is only available on qualifying plans and billing periods, so always check the plan details before making your purchase.
This is one of the biggest benefits of How to Get a Free Domain for 1 Year with Hostinger because you don’t have to pay separately for your domain during the first year.
2. Which domain extensions are included in the free domain offer?
The available domain extensions may vary depending on your country and the current Hostinger promotion. Popular extensions like .com, .in, .net, and others may be included, but availability can change over time.
During How to Get a Free Domain for 1 Year with Hostinger, you’ll see the eligible extensions while searching for your domain name.
3. Can I use my existing domain instead of registering a new one?
Yes. If you already own a domain from providers like GoDaddy, Namecheap, BigRock, or any other registrar, you don’t need to register a new one. You can simply connect it to your Hostinger hosting account.
4. What happens after the first year?
The free domain for 1 year is a promotional offer. After the first year ends, you’ll need to renew your domain at Hostinger’s standard renewal price to keep your website active.
Renewing your domain on time is an important part of How to Get a Free Domain for 1 Year with Hostinger because it prevents your website from going offline.
5. Can I transfer my domain to another hosting provider later?
Yes. If you decide to move your website in the future, you can transfer your domain to another registrar or hosting provider, provided you meet the domain transfer requirements.
6. What should I do after claiming my free domain?
After successfully completing How to Get a Free Domain for 1 Year with Hostinger, the next step is building your website. If you’re creating a blog, read my complete guide How to Start a WordPress Blog with Hostinger.
You can also follow How to Install WordPress Step by Step to install WordPress and launch your website in just a few minutes.
🚀 Ready to Build Your Website?
Claim your free domain for 1 year today and start building your website with Hostinger.
9. Final Verdict
If you’ve followed this guide from start to finish, you now know How to Get a Free Domain for 1 Year with Hostinger without any confusion. From choosing an eligible hosting plan and selecting the perfect domain name to completing your payment and verifying your domain, every step is beginner-friendly and designed to help you launch your website quickly.
One of the biggest advantages of How to Get a Free Domain for 1 Year with Hostinger is that you can save money on your first year while getting everything you need in one place. With reliable hosting, a free SSL certificate, fast LiteSpeed servers, an easy-to-use dashboard, and a free domain for 1 year, Hostinger makes starting a website simple, even if you have no technical experience.
If your goal is to create a blog, business website, portfolio, or online store, How to Get a Free Domain for 1 Year with Hostinger is an excellent way to begin your online journey. Once your domain is active, you can immediately start building your website and growing your online presence.
To continue your journey, I recommend reading these beginner-friendly guides:
Best Cheap WordPress Hosting Deals – Starting From Rs.55/mo (Choose the best Hostinger hosting plan)
How to Start a WordPress Blog with Hostinger (Build your WordPress blog step by step)
How to Install WordPress Step by Step (Install WordPress correctly)
🚀 Ready to Claim Your Free Domain?
Start your website today with Hostinger, claim your free domain for 1 year, and begin building your online presence with confidence.